Knots, Splices and Rope Work, by A. Hyatt Verrill
Chapter 7 - Fancy Knots And Rope Work
CONTENTS
- Cover
- Introduction
- Chapter 1 - Cordage
- Chapter 2 - Simple Knots And Bends
- Chapter 3 - Ties And Hitches
- Chapter 4 - Nooses, Loops, And Mooring Knots
- Chapter 5 - Shortenings, Grommets, And Selvagees
- Chapter 6 - Lashings, Seizings, Splices, Etc.
- Chapter 7 - Fancy Knots And Rope Work
FANCY KNOTS AND ROPE WORK
The knots and splices described above are all more for practical use than ornament, although such shortenings as the Single and Double plaits, the Chain knots, the Twofold, Fourfold, and Sixfold knots, and others are often used for ornamental purposes only. A certain class of knots are, however, really ornamental and seldom serve to fasten two ropes together, or to make any object fast to another. They are, however, very useful in many ways, especially aboard ship, and they are so handsome and interesting that every one interested in rope work should learn to make them.
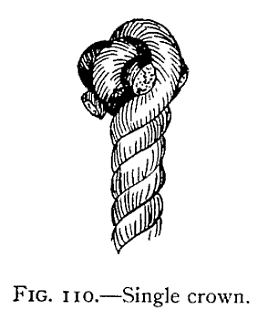
The simplest of the fancy knots is known as the "Single Crown" (Fig. 110). To form this knot unlay the strands of a new, flexible rope for six to eight inches and whip the ends of each strand, as well as the standing part, to prevent further untwisting.
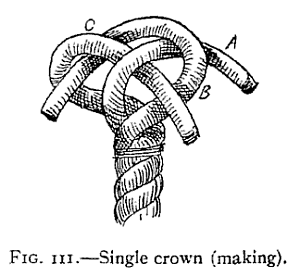
Hold the rope in your left hand and fold one strand over and away from you, as shown in A, Fig. 111. Then fold the next strand over A (see B, Fig. 111), and then, while holding these in place with thumb and finger, pass the strand C over strand B, and through the bight of A as shown in the illustration. Now pull all ends tight and work the bights up smooth and snug; cut off ends and the knot is complete. This single crown is a very poor knot to stand by itself, however, and is mainly valuable as a basis for other more complicated knots and for ending up rope.
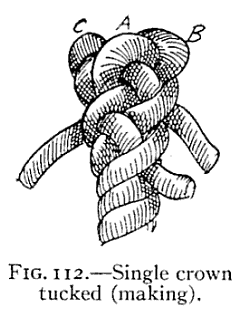
To end up a rope with a crown it is merely necessary to leave the projecting ends long and then by bringing them down tuck under the strands of the standing part, as shown in Fig. 112.
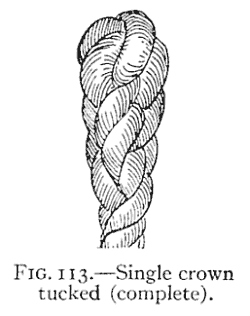
Then halve the strands and tuck again, as in making a short splice, until the result appears as in Fig. 113. This makes a neat, handy, and ship-shape finish to a rope's end and is very useful for painters, halyards, etc. It will never work loose like a seizing and is quickly put on at any time, whereas to make a seizing one must be provided with small stuff of some sort, and this is frequently not at hand.
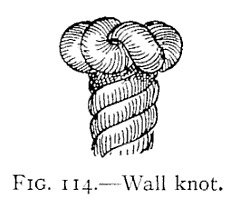
The "Wall Knot" (Fig. 114) is almost as simple as the crown, and in fact is practically a crown reversed.
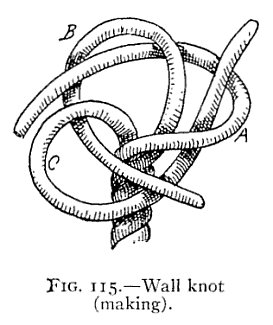
In making this knot bring C downward and across the standing part; then bring A over C and around standing part and finally bring B over A and up through bight of C, Fig. 115.
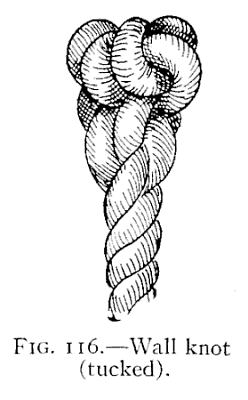
When drawn snug the ends may be trimmed off close or they may be tucked and tapered as in the crown and will then appear as in Fig. 116.
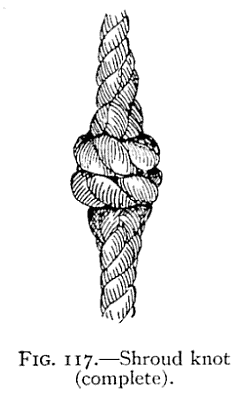
As in the case of the crown knot, the wall is mainly of value as an ending when ends are tucked, or as a basis for more ornamental knots such as the "Wall and Crown," or "Double Wall," or "Double Crown." It is also very largely used in making "Shroud Knots" (Fig. 117).
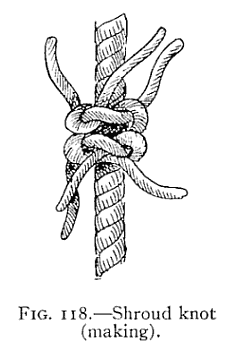
The common shroud knot is made by opening up the strands of a rope's end as for a short splice and placing the two ends together in the same way. Then single "wall" the strands of one rope around the standing part of another against the lay, taper the ends, and tuck and serve all with yarn or marline (Fig. 118).
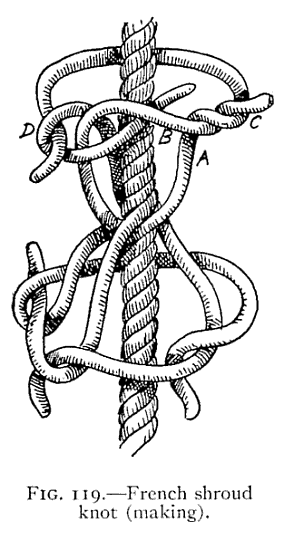
The "French Shroud Knot" is far neater and better, but is a little harder to make. Open up the strands and place closely together as for the short splice; make a loop of strand A, pass the end of B through the bight of A, as at C, make a loop of strand D, and pass the end of strand A through it as at D; then pass the end of strand D through the bight of strand B and one side is complete.
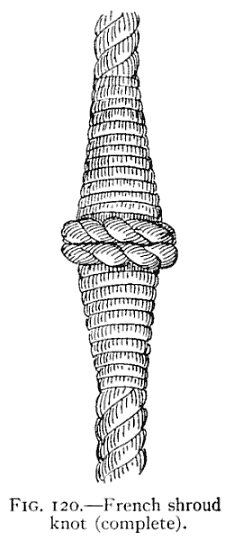
Repeat the operation on the other side, draw all ends taut, and taper and tuck the ends. The whole should then be served carefully and the finished knot will appear as in Fig. 120.
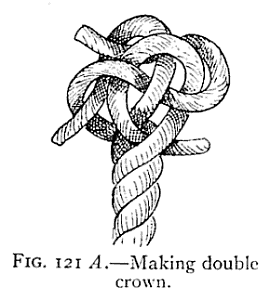
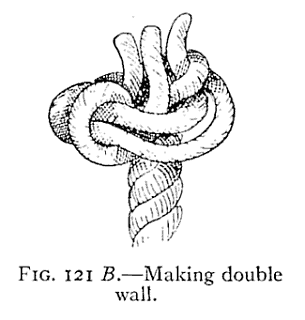
Double wall and double crown as well as the beautiful double wall-and-crown knots are made exactly like the single crown or wall but instead of trimming off or tucking the ends they are carried around a second time following the lay of the first, as shown in Fig. 121, which shows the construction of a double crown at A, and a double wall at B.
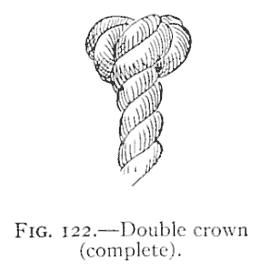
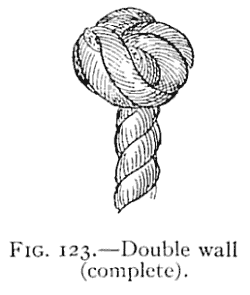
When finished, the ends may be tucked or trimmed and the two knots will look like Figs. 122 and 123.

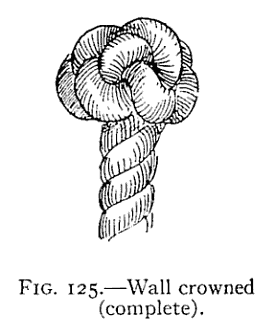
A far better effect is obtained by "Crowning" a wall knot. This is done by first making a single wall knot and then by bringing strand A up over the top and laying B across A and bringing C over B and through the bight of A; a crown knot is formed above the wall, as shown in Figs. 124 and 125.

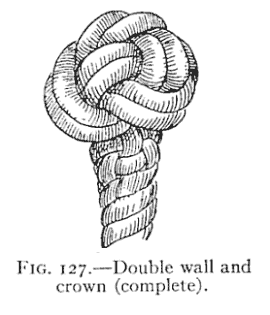
This is the foundation of the most beautiful of rope-end knots, known as the "Double Wall and Crown," or "Manrope Knot," illustrated in Fig. 126. Make your single wall and crown it, but leave the strands all slack; then pass the ends up and through the bights of the slack single-wall knot and then push them alongside the strands in the single crown; pushing them through the same bight in the crown and downward through the walling. This may seem quite difficult, but if you have learned the wall and crown you will find it simple enough, for it is really merely "following" the strands of the single wall and crown. The result, if properly done, and ends drawn tight and cut off closely, is surprising, and to the uninitiated most perplexing, for if the ends are tapered and tucked through the standing part of the ropes, as shown in Fig. 127, there will be no sign of a beginning or ending to this knot. This is probably the most useful of decorative knots and is largely used aboard ship for finishing the ends of rope railings, the ends of man-ropes, for the ends of yoke-lines and to form "stoppers" or "toggles" to bucket handles, slings, etc.
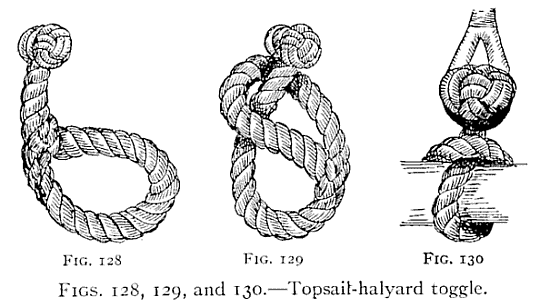
Its use in this way is illustrated in Figs. 128-130, which show how to make a handy topsail-halyard toggle from an eye splice turned in a short piece of rope and finished with a double wall and crown at the end. These toggles are very useful about small boats, as they may be used as stops for furling sails, for slings around gaffs or spars, for hoisting, and in a variety of other ways which will at once suggest themselves to the boating man.
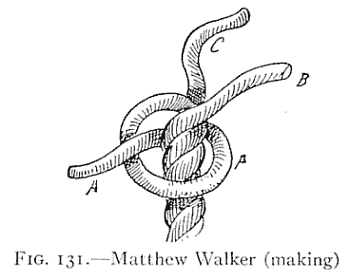
The most difficult of ending knots and one which you should certainly learn is the "Matthew Walker" (Fig. 131), also known as the "Stopper Knot." To form this splendid knot, pass one strand around the standing part of the rope and through its own bight, then pass B underneath and through bight of A and through its own bight also; next pass C underneath and around and through the bights of A, B, and its own bight.
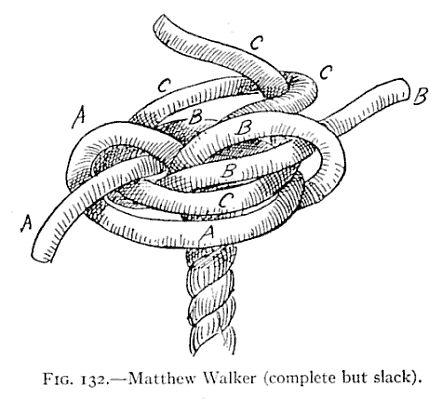
The knot will now appear as in Fig. 132, but by carefully hauling the ends around and working the bight taut a little at a time the knot will assume the appearance shown in Fig. 133.
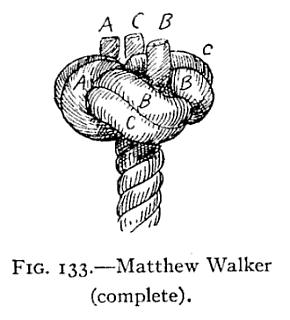
This is a handsome and useful knot and is widely used on ends of ropes where they pass through holes, as for bucket handles, ropes for trap-door handles, chest handles, etc. The knot is well adapted for such purposes, as it is hard, close, and presents an almost flat shoulder on its lower side.
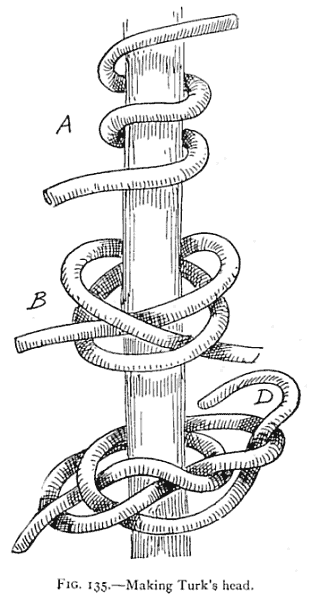
The "Turk's Head," Figs. 135 and 136, is a knot much used aboard yachts and warships and is so handsome and ornamental that it is a great favorite. It is used in ornamenting rigging, in forming shoulders or rings on stays or ropes to hold other gear in place, to ornament yoke lines, and for forming slip-collars on knife lanyards. It is also used to form collars around stanchions or spars, and, placed around a rope close beneath a man-rope knot, it gives a beautiful finish. When made of small line sailors often use the Turk's Head as a neckerchief fastener. Although so elaborate in effect, it is really an easy knot to make, and while you may have difficulty in getting it right at first a little patience and practice will enable you to become proficient and capable of tying it rapidly and easily in any place or position.
To make a Turk's Head, have a smooth, round stick, or other object, and some closely twisted or braided small line. Pass two turns of the line around the rod, A, Fig. 135, from left to right, and pass the upper bight down through the lower and reeve the upper end down through it, as at B. Then pass the bight up again and run the end over the lower bight and up between it and the upper bight. Turn the upper bight again through the lower one and pass the end over what is now the upper bight and between it and the lower, C, Fig. 135.
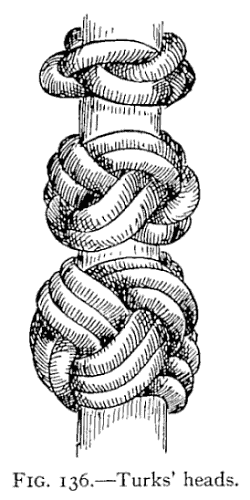
Now work from left to right, following the lay of the knot (or, in other words, passing your long end alongside the first end), D, Fig. 135, until a braid of two or more lays is completed, as shown in Fig. 136. The Turk's Head may be drawn as tight as desired around the rope, or rod, by working up the slack and drawing all bights taut.
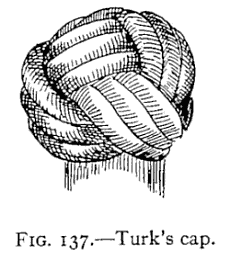
A variation of the knot may be formed by making the first part as described and then by slipping the knot to the end of the rod; work one side tighter than the other until the "Head" forms a complete cap, as shown in Fig. 137. This makes a splendid finish for the ends of flagpoles, stanchions, etc.
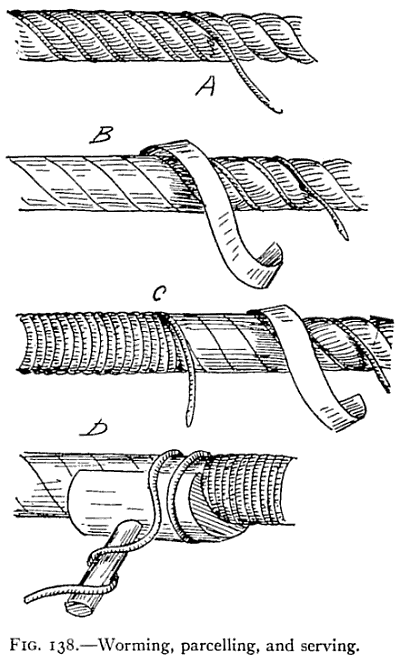
Ropes that are to be used as hand-lines, stanchions, man-ropes, railings, or in fact wherever a neat appearance counts, are usually wormed, served, and parcelled. Worming consists in twisting a small line into the grooves between the strands of rope, A, Fig. 138. This fills up the grooves and makes the rope smooth and ready for serving or parcelling. Parcelling consists in covering the rope already wormed with a strip of canvas wound spirally around it with the edges overlapping, B, Fig. 138. Serving is merely wrapping the rope with spun yarn, marline, or other small stuff, C, Fig. 138. Although this may all be done by hand, yet it can be accomplished far better by using a "Serving Mallet," shown in D, Fig. 138. This instrument enables you to work tighter and more evenly than by hand, but in either case you must have the rope to be served stretched tightly between two uprights.
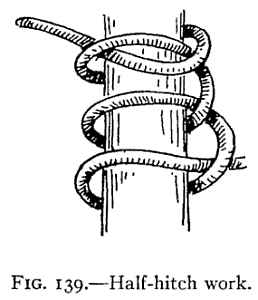
Often a rope is served without parcelling and for ordinary purposes parcelling is not required. A variation of serving is made by "half-hitch" work, as shown in Figs. 139-140. This is very pretty when well done and is very easy to accomplish.
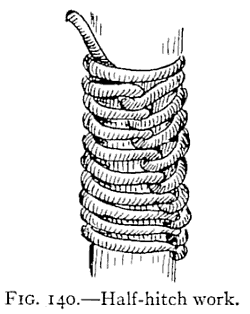
Take a half-hitch around the rope to be served, then another below it; draw snug; take another half-hitch and so on until the object is covered and the series of half-hitch knots forms a spiral twist, as shown in the illustrations. Bottles, jugs, ropes, stanchions, fenders, and numerous other articles may be covered with half-hitch work; and as you become more expert you will be able to use several lines of half-hitches at the same time.
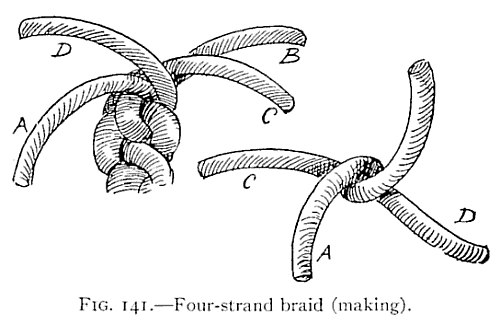
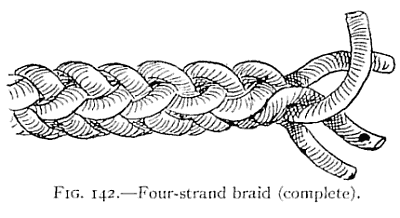
Four-strand braiding is also highly ornamental and is easy and simple. The process is illustrated in Fig. 141, and consists in crossing the opposite strands across and past one another, as shown in A, B, C, Fig 141.
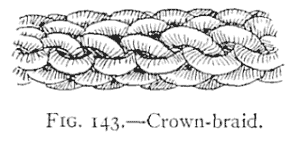
Still more ornamental is the "Crown-braid" which appears, when finished, as in Fig. 143. The process of forming this braid is exactly like ordinary crowning and does not require any description; it may be done with any number of strands, but four or six are usually as many as the beginner cares to handle at one time.
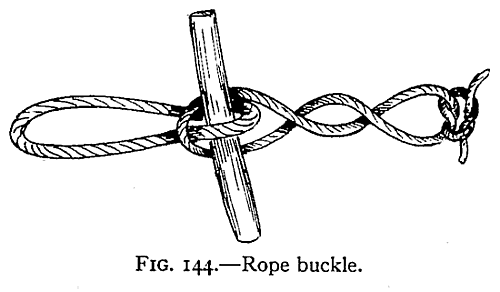
When the rope-worker has mastered all the knots, ties, bends, hitches, and splices I have described, he will find a new field open to the use of rope in innumerable ways. Barrels, casks, bales, or other objects may be roped, or slung, with ease and security; ropes will be pressed into service for straps and belts; and buckles may be readily formed by the simple expedient shown in Fig. 144.
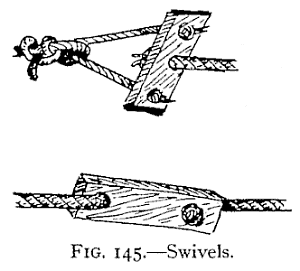
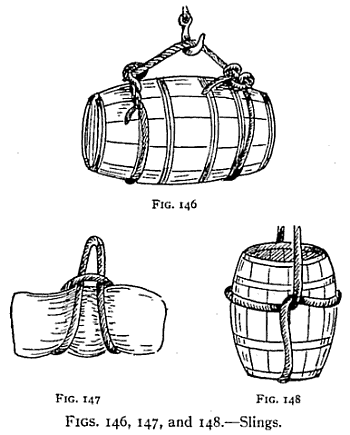
If a swivel is required it can be arranged as shown in Fig. 145, while several simple slings are illustrated in Figs. 146-148. In a factory, or machine shop, rope belting will often prove far better than leather, and if well spliced together will run very smoothly and evenly even on long stretches. As a recreation for killing time aboard ship, or on rainy vacation days, few occupations will prove more enjoyable than tying fancy knots and making new splices and bends or inventing new variations of the numerous hitches, ties, and knots you already know.
HALTERS FOR ANIMALS
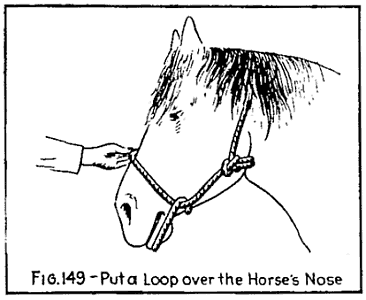
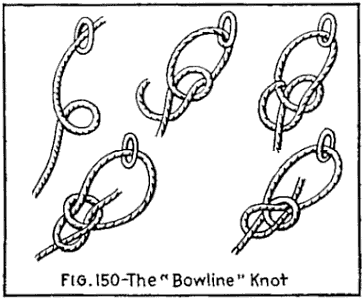
Every now and then a temporary halter is needed for a horse, and in Fig. 149 such a halter is shown. This halter is made by putting the end of a long rope around the neck of the horse and then tying a common bow-line knot. (See Fig. 150.)

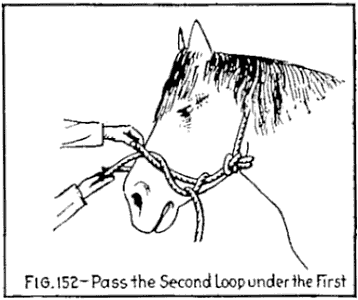
Fig. 151 shows the second step to be followed, that of passing the rope around the animal's head twice, while Fig. 152 shows how the second loop is passed under the first.
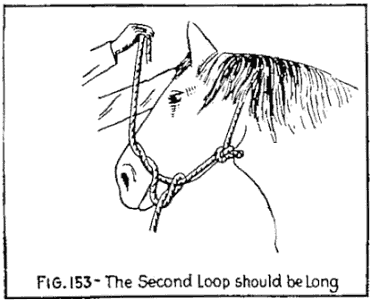
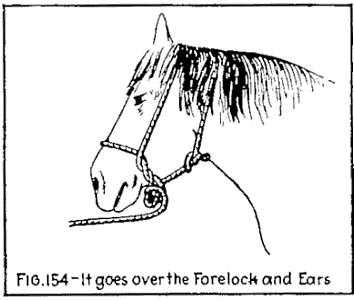
In Fig. 153 the rope is shown sufficiently long enough to enable it to be passed over the ears of the animal and leave the halter completed, as shown in Fig. 154.
NOTICE: Some pages have affiliate links to Amazon. As an Amazon Associate, I earn from qualifying purchases. Please read website Cookie, Privacy, and Disclamers by clicking HERE. To contact me click HERE. For my YouTube page click HERE