Halyard Splice
Introduction
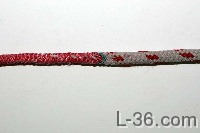
Have you wanted a halyard with strong and light High Modulus line like Amsteel aloft but know it needs a cover so it wont slip on the cleat but find stripping Warp Speed just too expensive and still too thin to get a good grip on? This may be your answer. I have spliced 1/8 Amsteel to 1/4 inch Sta Set and have tested it to the breaking point of my 1/4 inch StaSet* as it goes over a Barient 22 Winch. These dimensions scale to 3/16 Amsteel and 3/8 Sta Set (or Samson XLS) making for a halyard as low stretch as wire yet easy on the hands and pocketbook. If you pick your vendors from the sources page, you can make a 100 foot halyard with 3/16 Amsteel and 3/8 XLS for $70 (and some time). Put a Brummel Splice in the end for the shackle and you are done.
Overview
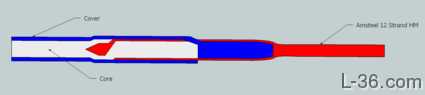
We are going to bury 9 inches (seventy-two diameters) of 1/8 inch Amsteel in the 1/4 inch double braid. 7 inches will be between the core and cover. 2 inches will be inside the core. On the other side, we are going to bury 9 inches of cover inside the Amsteel. This part of the bury provides the holding force for the first part. The cover bury will be in two parts. The part closest to the splice will be braided as it normally is and the part furthest from the splice will be unbraided to ease the construction of the splice. Be sure to click on the thumbnails for a closer look.
Splice Instructions
(click on image for larger version)1. Measure Cover Measure off 9 inches of the cover and make a mark. |
2. Extract Core Bend the cover tightly and, using a pick, pry out the core out of the line. I used a #6 knitting needle as a pick. |
3. Reposition Cover Tie a slip knot back on the Sta-Set about 6 feet and bunch the cover back to the knot. Then milk the cover back to the end. Do this a couple of times and finally milk the cover back tightly toward the end. This positions the line as it will be at a later step and helps the next measurement be correct. |
4. Mark the Core Mark the core where it exits the cover. |
5. Prepare the Core Cut the core at the mark you just made. Then make two more marks. The first one at about an inch back and the second one 5 1/2 inches further down the core. This first mark will be about where the cover returning to. The 1 inch allows for shrinkage of the cover due to the Amsteel bury. The 5 1/2 inches will take 7 inches of Amsteel due to shrinkage from having the core inside. |
6. Attach fid to core Tape the core to your fid. I used a #6 knitting needle cut to one fid length (twenty-one diameters = 2 5/8 inches) |
7. Measure Amsteel Measure 2 inches from the end on the Amsteel and make a mark. |
8. Bury the core in the Amsteel Work your fid inside the Amsteel at the 2 inch mark until the the 5 1/2 inch mark lines up. Then poke the fid through the Amsteel and remove it and the core. Line up the 5 1/2 inch mark again with the 2 inch mark on the Amsteel. |
9. Taper the Amsteel At 1 inch from the tip of the Amsteel, remove two strands, one right and one left. Then skip a strand moving toward the end and remove two more then skip and then remove two for a total of six strands pulled. |
10. Cut the Taper Tape off the end just past the last removed strand pair and then cut off the strands you pulled |
11. Bury the Amsteel in the Core Bury this 2 inch section of Amsteel in the core. We do this so that the Amsteel will stay put when we milk the cover back over it. Without this step, the cover will just pull the Amsteel along and undo the splice. We don't need this crossover for strengtrh as much as for assembly. Don't let the other end of the core slip into the Amsteel. |
12. Pull it Tight Pull the core and the Amsteel until you have a nice smooth bury. |
13. Close up of Bury Here is a close up showing the smooth transition. This allows the cover to slide over without problem. |
14. Milk the Cover Milke the cover back over the part of the splice we just did. You will need to anchor the knot that is 6 feet down the line. I used a door knob but on my boat I would use a cleat. Milk it back several times until you can see about an inch until the core inside the Amsteel ends. It takes a good deal of effort to get this step correct. Note the fid marking the end of the core. |
15. Mark the Amsteel Put a mark on the Amsteel where the cover exit point ends. |
16. Mark the core Open up a section on the Amsteel at the mark and mark the core. |
17. Trim the Core Slide the cover and the Amsteel back and cut the core at the mark. Do not taper the core. The cover will be inserted here and no taper provides the smoothest splice. |
18. Milk Cover Back Milk the cover back so that everything is in place again. |
19. Mark Cover Mark the cover at the half way point. |
20. Unbraid Cover Unbraid this section of the cover by pulling single strands out of the braid at the mark you just made until you have pulled all the strands out. |
21. Unbraided Cover You should now have this. |
22. Attach Fid Attach your 4mm fid very tightly to the unbraided strands. We need unbraided strands because it is impossible to bury the braided cover otherwise as far as I can tell. |
23. Enlarge Opening Work the opening where you will be burying the cover to really open it up. This is critical |
24. Mark Target Mark about 14 inches down the Amsteel. This will shrink with the cover buried but forms a target for the bury. |
25. Clear the Way If you are making this splice with 1/8 inch Amsteel, this next bury is difficult. Run a larger (5mm) knitting needle or fid inside the Amsteel just to clear the way for your fid. If you are making your halyard with 3/16 Amsteel and 3/8 double braid, this step is easy using a Splicing Wand. |
26. Bury the Cover It is imprtant that the tape be slipery. I use scotch tape but I think teflon tape (million dollar tape) would work better. For the splice in the picture, it took several tries and even at that, the fid came lose and about half way along. I just took it out along the side, cleared my tape, and pulled the cover out the side of the Amsteel. I then pulled the cover tight and re-inserted my fit in the exact same hole and did the bury in two steps. |
27. Tape the Cover Cut a taper on the cover. If you find that the cover is too long after the next step, cut it back but maintain a taper. |
28. Pull the Splice Tight Work the cover and the Amsteel unti the splice is smooth as shown. |
29. Lock Stitch the Splice Starting 1 inch from the splice, stitch in an S path toward the splice then past it on the other side. Run at least three stitches on each side. Tie an overhand knot against the line and run the thread back through the same last hole to pull the knot inside. Cut off your line flush where it exits. One knot has been made in the sketch above. You might want to whip the splice as well. |
30. Finished! This is the finished splice. |
Theory of the Splice
A splice is held together by the friction between the different parts of the line in the bury. Frictional force is dependent on the coefficient of friction of the material, the contact area, and the holding force pressing the materials together. The contact area goes up as the length of the bury increases. The holding force comes from the constricting force of the braid diameter shrinking as it is pulled tight. The same force that wants to pull the splice apart provides the holding force that keeps it together. What we need is for the constricting force, contact area, and coefficient of friction to add up to more holding force than the pulling force on the line.
The problem with Class 2 ropes like Amsteel is that they are slippery and have low coefficients of friction. With all of this in mind, the Amsteel was placed between the double braids so that there would be twice the contact area than there is in a normal single braid splice. The bury of the cover inside the Amsteel provides the constricting force as the lines are stretched. It turns out that because the cover is relatively thick, the Amsteel is forced to open up and the weave angle increased to allow the space for the cover. When the pulling force is applied, the Amsteel weave angle tends to revert toward its normal angle and it squeezes very hard on the buried cover. It is likely that this splice needs far less cover buried to work because of this. But this is what I did so it is what I described.
The visualization is that as the line is pulled the first thing that happens is that the Amsteel weave over the buried cover constricts holding the cover tight. As things stretch more, the cover is pulled tight over the splice and that provides the constriction force that holds the splice together.
Testing of the Splice
Test Bench |
Note: As of 1/30/2011 my testing has been with new Amsteel and some existing 1/4 inch Sta Set. My test setup consists of an 8 foot long 4x4 with a Barient 22 winch on one end and a pad-eye on the other. I have tested two splices. An earlier version of the splice was pulled until the 1/4 inch Sta-Set broke right where it hit the winch. The version shown in the diagrams above was tested but this time I wanted to cycle it without breaking it. I stressed it about a dozen times to about 1,000 pounds. The last time I measured the force by hooking a line with some weights over the winch handle and the pull was 1,100 pounds. The StaSet was showing signs of being crushed where it went over the winch so I have every reason to believe the failure would be there this time as well. The splice showed no signs of stress from the test. The winch is 40.3:1 measured and I pulled on the winch handle with 27.5 pounds of steel weights (click on image to enlarge). |
NOTICE: Some pages have affiliate links to Amazon. As an Amazon Associate, I earn from qualifying purchases. Please read website Cookie, Privacy, and Disclamers by clicking HERE. To contact me click HERE. For my YouTube page click HERE