Mast Climbing
Mast Climbing
A review of 6 methods for unassisted (solo) mast climbing
(Edited 4/6/2019)
Introduction
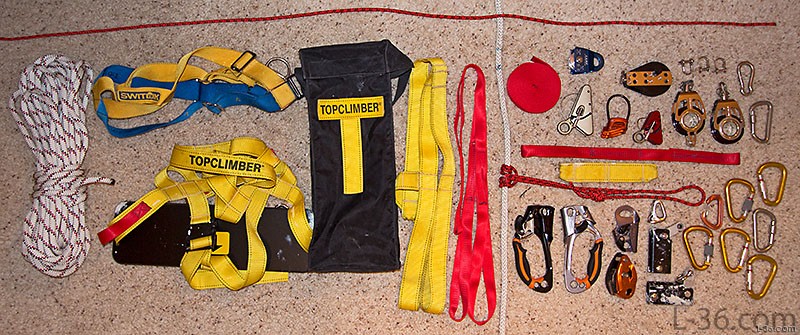
There are many articles reviewing different ways of climbing a mast. There are also articles where people tell how they do it, their pet way. After frustration that none of the ways I have tried over the years or read about doing as complete a literature search as I could, would meet my goals, I went out and tried to come up with a new way, something that would meet my goals. This article reviews six ways of climbing a mast without help form anyone else. It talks about the pros and cons of each system and scores them on a set of criteria. The high score system is one I developed using some mountain climbing gear. I tried almost every mountain climbing mechanical and non mechanical assist that I could buy before settling on the system I like.Background
When I got my boat in 1989 it had a bosun's chair made of sail cloth. I would attach it to a halyard and someone would pull me up using a winch. I soon realized two things. First was that there was seldom someone around to haul me up. Second was that the chair, without a hard seat, was not very comfortable. It was also of unknown age and strength and there was no way to know when the stitching would fail and I would die. Thus began my multi decade search for something better.Disclaimer
Climbing your mast is inherently dangerous. Whatever way you pick is your choice. I am not an expert and am not offering advice. I am just explaining the though process I went through in picking a way for myself. Your goals may be different. One thing I do recommend is to have 100% redundant backup. This means an independent safety line going to an independent attachment to your body, with nothing shared. In my case, a harness on the backup and a chair on the main system. Without a safety harness and line, you are risking a horrible death against your deck. Research systems for yourself and buy something safe. I am not recommending any specific system and take no responsibility if you decide on your own to try something similar. You and only you are responsible for your safety.NOTE: The following links are affiliate links. I earn a small commission if you follow the links and purchase products. It helps keep me posting so please use the links.
Summary
I have climbed my mast using five different methods. The least safe, in my view, is having someone haul you up using a winch. Maybe having two people haul you up, one to grind and one to sail, would be safe, but a single person on one halyard is not the answer for me. I have also climbed with the ATN TopClimber, a 3:1 block and tackle, the GriGri method, and the modified method explained in this article. The TopClimber is the hardest, the GriGri the easiest but also the one that can scare you to death. The block and tackle cannot get you to the very top. My preferred method is the modified one, discussed last. But I present them all here for your enjoyment. That said, I am not recommending any one method as everyone's requirements and skill levels are different.Bosun's Chair Or Climbing Harness
Before I get into specific solutions, a fundamental decision needs to be made. Bosun's chair or mountain climbing harness. There are advocates of both. Below is my take on it.Before you decide to use a harness for anything other than the safety line (and I would not climb without a harness to a safety line) you need to sit in one. About 10 seconds in a climbing harness at the local REI let me understand how comfortable a bosun's chair with a rigid seat is. Typical climbing harnesses are not meant to sit in. They allow freedom of movement for people climbing up mountains, not for people hauling themselves up and sitting there for hours while working on their mast. Even mountain climbers use chairs with rigid seats and some of these are reviewed for mast climbing. An example is the Black Diamond Bosun's Chair
Safety Line
Just a word on safety lines. Never go up a mast where a single failure could kill you. This means you must have a safety line attached to something other than the bosons's chair. You need a second attachment. I used to use a marine harness but now I use a climbing harness. I would never go up my mast without a second safety line. If you have someone on deck, this is trivial but as I mentioned, I don't. With the ascender based systems, the safety line is not too hard to deal with because the ascenders lock you in place. You can ascend a bit, sit and adjust the safety line however you are dealing with it. With the pulley system, you have to let go of the main line to adjust the safety line. As you really don't want to let go of the line, you have to tie it off. This really becomes both a pain and a safety concern. You don't want to fall a foot against a non stretch line so ideally you would tie off the main line every foot and adjust the safety. This just isn't going to happen.Goals for Ideal System
Everyone will have their own set of goals for climbing a mast. One goal not listed below is that I want to climb alone. If you have someone to hoist you up, just get a comfortable chair and have then grind you up. Ideally you would have someone tail the line in addition to the grinder. Do use a safety line on a separate halyard no matter what.- Safety
- Comfortable
- Efficient in climbing
- Get above top of mast
- Get to spreader tips
- Single line
- Line not constrained at bottom
- Can let go of everything and not fall
- No re-rigging things at the top
- Minimum of skill or practice required
ATN Top Climber and Mastclimber
I saw the ATN Top Climber at a boat show many years ago and bought it. It looked great and I used it for several years. You can indeed climb alone and get above the top of the mast. What more could I want? There are a few things I didn't like about the Top climber. Mine was the original design, which I see has been greatly improved, but mine is very difficult to set up unless you dedicate a line to it which I never got around to doing because of the other limitations. Next was that you need to anchor the lower end of the line and pull it crazy tight. It is recommended that you anchor away from the mast to make it easier to climb. Try getting to the spreaders or painting your mast when your line is away from the mast. Doesn't work - can't be done. So I would have to anchor it to the base of the mast. With the line anchored at the base of the mast, the ascenders tend to scrape the mast going up and down. I tried all kinds of pads with some success but they would always come off at some point. Second problem is that you are locked to one face of the mast. You cannot get out to the spreader ends, or to the other side of the mast. This was just not acceptable so I quit using it. The final straw came when I noticed that the action of using the ascender had almost completely unscrewed the shackle that was keeping me from dying against the deck below. My friend has one of the new version, the ATN Mastclimbers, and it addresses these safety concerns. The ascenders are easier to attach and there are no screw on shackles. But I want something I can use and get to all sides of the mast, the spreader ends, and not be tied to the deck at the bottom of the line. I believe you can do that with the top climber if you just do not tie down the bottom of the rope but because of the ascender design, it becomes very inefficient. I also found using the ATN Top Climber very difficult. The ascenders are awkward to work with although the new ones might be better, I have not used them.Blocks 3:1 and 4:1
With enough rope and pulleys, you can easily pull yourself up the mast. Because you are not anchored to the base of the mast, you can move around to the spreader tips and to the other side of the mast. What I used was a 3:1 system with a hex ratchet block attached to the ATN bosun's chair. The mast head had a single block with a becket. Some people might thing this is a 2:1 system and it would be if someone on the deck were pulling on the line. But because you are on the chair and pulling yourself up, you get 3:1. Think of it this way: With a 40 foot mast you need 120 feet of rope when you are at the bottom and 0 feet of rope when you are at the top. You have pulled in 120 feet of rope to climb 40 feet -- 3:1. Someone at the bottom would only be able to pull in 80 feet or rope -- 2:1.I weigh 180 pounds and 1/3 of that is 60 pounds. I can use both hands to pull, which is 30 pounds per hand. The trick to make this easy is the hex ratchet. It is one thing to pull 60 pounds when you are hoisting yourself up but another to have to hold a load all the time including while you are changing your grip for the next pull. The friction of the hex ratchet means there is very little force needed to just hold yourself in place. The ultimate setup is to have an auto ratchet with a becket at the top and a hex ratchet at the chair. I would assume you could let go of the line without descending with that setup but I have not tried it. The lower one can be turned off allowing you to go down.
The problem with this setup is that you cannot get to the top of the mast and you do have to hold onto the rope to prevent dying against the deck (at least with the single ratchet). The real issue is not so much climbing but in dealing with a safety line and of course the inability to get all the way to the top.
In addition, when you are descending, if you let go of the line you will come crashing down to the deck. Points off for that.
A word about rigging. Because you have a rather large block at the top of the mast, you really need to rig this to the main halyard to take advantage of the overhang there. I guess you could also use a spinnaker bail if you have one and get out that way. The main halyard presents a small problem with finding the second halyard to use as the safety line. I would take the spinnaker halyard and swing it around the spreaders to the back of the mast and just let it cross the shroud. Best I could come up with.
Mountain Climbing Solutions
The next thing I looked at was various mountain climbing solutions. I must have watched 100 YouTube videos on every gadget and technique used to climb. I purchased most of the gadgets and tried every combination I could think of, climbing up the 15 feet to the ridge beam in my attic to know if they would work. My modified solution uses a bosun's chair and two different rock climbing ascender types. Before I describe the system I came up with, I want to describe the things I tired that I didn't pick.Getting To The Top Of The Mast
The trick to getting to the top of the mast is to have foot loops and to stand up, pulling the chair up with you. Any system like this can get you to the top of the mast. This basically means I am using some kind of ascender system so the task becomes picking ascenders and deciding how to rig them. This is what the ATN system does and it is not a bad choice except for the design of the ascenders. They work fine when the line is tight but with a slack line, necessary to meet my goals, the ascender rotates under load and basically undoes 6 inches of your progress. It is just much harder to climb when the line isn't tight. Ideally you want the chair attached to the top ascender and the foot loops attached to the bottom ascender. The normal two ascender setup in mountain climbing uses a setup opposite to that. This is because the top ascender wants to be higher than the normal attachment point of the chair. ATN gets around this somewhat by providing an extension to raise the top ascender and then asks you to re-rig things when you get to the top to bring the chair up to the ascender and effectively eliminate the length of the extension. I found this nearly impossible to actually do but it can be done. With the normal dual ascender approach of mountain climbing, you would need to re-rig at the top to put the foot loop ascender at the bottom. This would also be the case with the Grigri based approach. The Grigri system has the added disadvantage that if you panic and start to go down too fast and grab the lever, you will go down even faster and likely die. I do not recommend it unless you are experienced with it from other hobby. That said, it is very easy to get down using a Grigri and if you let go, you stop.GriGri
There is an update on the GriGri method. Please see http://L-36.com/more_mast_climbing.phpDual Mountain Climbing Ascenders
This is very fast efficient way to climb up a rope. With a little experimentation, I found a setup that allowed me to go both up and down with little effort using these ascenders. The problem with this way of rigging is that you cannot get to the top without re-rigging once you get there.
I found the best way to rig the setup is to put the foot straps through a carabiner on the bottom of the ascender handle. A second carabiner would go through the safety hole locking the rope into the ascender. This carabiner also helps a great deal in going down as it keeps the rope from snagging on the teeth of the cam when you pull back on the thumb release. For the chair, I just put the carabiner that is on the chair through the top set of holes on the handle. This puts the chair as high as possible. Then if I re-rig at the top and put some shortened foot straps below the chair, I can get up above the top of the mast.
I don't like this method. The ascenders have sharp enges and are fairly large. They would scrape up my mast and as the modified approach just better and doesn't need any re-rigging, I don't see any reason to even try this. That said, it is the basis of the modified method so I included it for that reason.
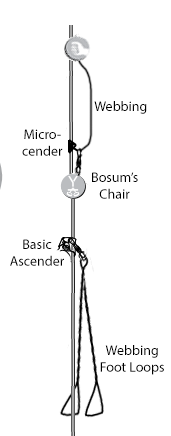
Modified Setup
The Rescucender, shown at the left, does not have teeth and relies on having a load on it to lock to the line. It is very secure when loaded but does tend to slip down when unloaded with just the slightest pressure. This makes it ideal for holding the chair to the line. It also makes it very easy to go down. Just grabbing the body and pulling down when unloaded will lower it on the line. The only issue is that it might be too easy to lower so you would want some lines to limit how far down it can go. Tying the ascenders together is good practice anyway and it solves the problem of the unloaded foot ascender going down. Of course, using a toothed ascender like the basic one at the right on the foot strap below the chair is not a particular issue as it is easy to adjust it when comfortably seated in the chair. The rescucender is very similar to the new style ATN ascenders with one significant difference. It is much heavier duty and it grabs the rope on the bottom of its body.
The reason I don't like the ATN ascenders on the chair is that the lock is on the top of the ascender on the ATN version and on the bottom on the rescucender. Other than that they are similar. The problem with having the cam at the top is that the ascender flexes 90 degrees when loaded. This uses up about 5 inches of line and as you are climbing just a foot or so at a time, these 5 inches are significant.
Rescucender, Microcender, or Basic Ascender
I used what was called a Microceneder which is no longer made. I felt it was too weak and would slip down the rope so I modified it with a heavier spring. Maybe that is whey it isn't made any longer. I have also used the old style rescucenere and I understand the new one to be much better al thought I have not used it. The basic ascender has teeth and grabs the rope securely, too securely for my taste for the upper ascenter. A toothed ascender is a very good idea for the lower ascender because it will stop any sliding ascender in case something should go wrong. At this point I thing the rescucender is the way to go for the upper ascender.The Setup
The setup of the modified approach is fairly simple. The boson's chair is attached using a carabineer to an ascender (Rescucender, Microcender or Basic Ascender). The foot loops are made of climbing grade tubular webbing and are attached below the top ascender to the lower basic Petzl ascender. The attachment is with a second carabineer and it is hooked through the top hole. The reason for using the top hole, besides locking the line securely in place, is that releasing the tension on the ascender to lower it down the line can tend to hang up on the spikes of the cam. Having the carabineer body there helps keep the line away from the spikes. I like using the basic ascender because once you get up a little bit, the weight of the line is enough so you can just lift the ascender and it will come up the line easily.There is a trick to make this setup work much easier. Sitting in the bosun's chair you grab the line above you as high as you can with one hand near but above the other. Then you stand up against the foot straps and hold on to the line. Make a short section of tubular webbing that goes from the carabineer on the chair to your upper hand. The carabineer has a natural position under load. Put the strap where it will not interfere with that position. Once you get to the standing position, you climb up the line with your hands putting the lower hand higher up and then raising the upper hand (with the webbing loop) up to meet it. The act of raising your hand with the webbing will raise the ascender and lift the chair up so you can sit down in your new higher position. This is a very slick little refinement and helps a great deal in getting up the line. In going down, you again stand up with the lower ascender a foot or so below the top one. Put one hand on the rope and the other on the ascender. Then give a little tug up on the microcender or rescucender or lift the lever, which releases the tension, and slide it down to near the lower ascender. If you are using a basic ascender on top, you need to slide the release lever and lower it down the line. This takes a little more practice. If you let it touch the lower ascender, you will have to raise it up a bit before releasing the lower ascender but no big deal. After you sit down, lower the bottom ascender and repeat the process until you are at the bottom.
The Hand Strap
The hand strap is actually optional. I like it because you can climb the line with a little more natural way, hand over hand on the rope without worrying about the ascender. But you can climb almost as easily by grabbing the line with one hand and the ascender with the other. Grasp the line high, stand up, and slide the ascender up. I found that it is a bit better to have the hand strap pull equally on each side of the ascender handle so I put a 3 inch spectra loop through the lower eye in the hand strap. This creates loops on both sides of the hand strap and I thread one of these loops through the carabiner, then the microcender, and finally the other loop. This creates a kind of bridal to pull equally on both sides of the microcender. The trouble with pulling on just one side is that it can rotate the carabiner if you are not careful. This is worse if the hand strap is not on the best or natural side of the microcender handle as mentioned in the setup section.More on Foot Loops
Every person is different and every chair is different as well. You will need to work out the lengths of the foot loops to fit your situation. In general, you want the length to be far enough away from the top ascender to give yourself some working room yet still in front of you up high so you can easily work them as you go up and down. I tried a setup with very short foot loops and, while I was able to cut one minute off the ascent time by using some shock cord to pull the lower ascender along, getting down was terrible and took almost twice as long. It is much better to keept everyting up where you can get at it.The Connections and Line
Any good line, 3/8 to 7/16 should work with climbing hardware. I bought some 11mm climbing rope. It was under $1 a foot and I bought 50 feet to go up my mast. It is stiffer than yacht braid and seems to work somewhat better than yacht braid. The ascenders slide up more easily. I recommend a dedicated line for ascending. For the safety line, anything will do as if I am hanging from it, I am not going to worry so much about how the ascenders work. I am going to worry more about how I am going to get down.
Video
This video is 6 minutes and while the climb was about 4 minutes up and just a tad over that down, the video is edited to show just the good parts. You can see the full length version of my first climb, which was about 5 minutes up and down on YouTubeCost
NOTE: When pricing line,I assumed 40 feet as one way up the mast. Sources are Amazon, REI, WestMarine, and LFS.| Solution | Harness | Microcender | Ascender | Webbing | Carabineer (2) | Grigri | Upper Block | Hex Ratchet | Line | Total |
| ATN | 500 | 500 | ||||||||
| Blocks (3:1) | 170 | 88 | 66 | 130 | 454 | |||||
| Blocks (4:1) | 170 | 85 | 66 | 175 | 496 | |||||
| Dual Ascenders | 170 | 150 | 13 | 28 | 42 | 403 | ||||
| Modified | 170 | 62 | 55 | 13 | 28 | 42 | 370 | |||
| GriGri | 170 | 75 | 13 | 28 | 100 | 42 | 428* |
Score
| Solution | Comfortable | Efficient in climbing | Get above top of mast | Get to spreader tips | Single line | Line not constrained at bottom | Can let go of everything and not fall | No re-rigging things at the top | Minimum of skill or practice required | Ease of getting down | Total |
| ATN (original) | 5 | 4 | 5 | 0 | 5 | 0 | 5 | 4 | 4 | 2 | 34 |
| Blocks (3:1) | 5 | 4 | 2 | 5 | 3 | 5 | 3 | 5 | 5 | 4 | 41 |
| Blocks (4:1) | 5 | 5 | 2 | 5 | 2 | 5 | 3 | 5 | 5 | 4 | 41 |
| Dual Ascenders | 5 | 5 | 5 | 5 | 5 | 5 | 5 | 3 | 4 | 2 | 44 |
| Modified | 5 | 5 | 5 | 5 | 5 | 5 | 5 | 5 | 4 | 3 | 47 |
| GriGir | 5 | 5 | 5 | 5 | 5 | 5 | 4 | 3 | 1 | 5 | 43 |
Attaching To The Safety Line
The idea of the safety line is to have an attachment that will keep you with the living should you get a catastrophic failure on the main setup, such as falling out of the bosun's chair. The ideal solution is something that just rides up and down the safety line and locks up if you fall. Petzl makes such a contraption for $200 for industrial applications but this seems like overkill. The next best thing is something that rides up and down the safety line with almost no friction until it is loaded and then prevents a fall. The attachment should be close to the climber as a fall abruptly stopped by a safety line can be deadly if from enough height. A 2 meter fall will likely break the halyard and or the hardware attached to it, for example. The idea then is to move the safety attachment easily and quickly with each foot of ascent or descent. The best solution I tried is a simple prussic knot loosely attached to the safety line such that it can be slid up or down with one hand. Weight it up and it will stop your fall. Don't weight it and it is easy to move. This simple knot, or one of its variations, out performed any expensive piece of hardware I tried although I did not try the $200 one. Use three wraps on the prussic and some 1/4" climbing rope. REI even made up the loop for me using 6 feet of rope and a double fisherman knot.Getting Down With The Safety Harness
One final comment on the safety line. Should the main bosun's chair fail or halyard fail, you will be hanging from your safety harness. Because I have always used my boats yacht harness, I decided it might be a good idea to see what it is like to hang from a line with my marine harness. I am pretty sure any fall at all would rip my arms off and even if my arms survived, hanging there for any length of time would probably kill me. There is a medical term for how you die that way that I saw in one of the 100 YouTube videos I watched but lets just say that trying it convinced me that the video was accurate. Although climbing harnesses are uncomfortable if used on the main line, I bought one to use as my backup for the safety line.If you do get stuck hanging from your safety line you should know how to get down. Watch some videos on climbing a line with just a prussic knot because this may be what you have. The trick is to get the line between your feet and stand on the line. Get the line to the left of your left foot. Then move your right foot over so that the line is to the right of your right foot. Move your right foot over to its normal position. At this point the line will be going from the deck, over your left foot, under your right foot, and from there up the mast. Now take your left foot and stand on your right foot. You can now stand up and slide the prussic knot down the rope a little. Repeat and hope you get down before you expire.
So what if you are not strong enough to do the stand on the rope technique? For $30 you can buy a Petzl Tibloc Ascender.
Summary
I like the modified setup when trying it in my attic. If you are going to try it, do so somewhere safe until you decide you like it. I have climbed my mast with all except the dual ascender setup. I like the modified setup and the GriGri the best but the GriGri requires a lot of practice. Since mast climbing is not done frequenty, I am going to use the modified system as it best meets my goals. I found it as easy as climbing stairs. I found the Top Climber the most difficult to climb. The block systems were between. I am not going to make a recommendation, that has to be your decision as it is your life not mine. Make sure you try any system, this or others, in a safe place before attempting a mast climb. Be sure you know how everything is rigged and are completely comfortable with the setup.Climbing Knots
This is a nice overview of climbing knots. To make foot loops in tubular webbing, I use a figure eight knot on the bright. Climbing KnotsNOTICE: Some pages have affiliate links to Amazon. As an Amazon Associate, I earn from qualifying purchases. Please read website Cookie, Privacy, and Disclamers by clicking HERE. To contact me click HERE. For my YouTube page click HERE