Basics of Sailboat Racing
By Captain Kangaroo
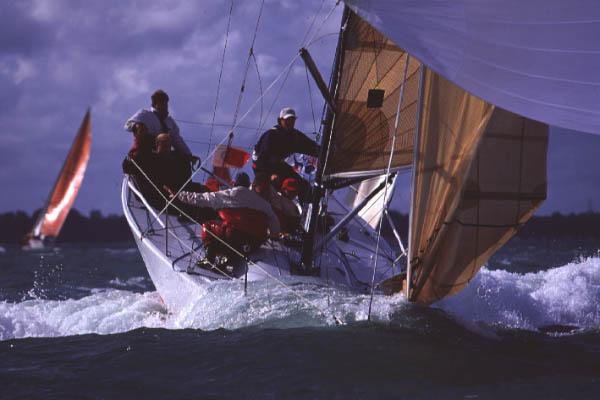
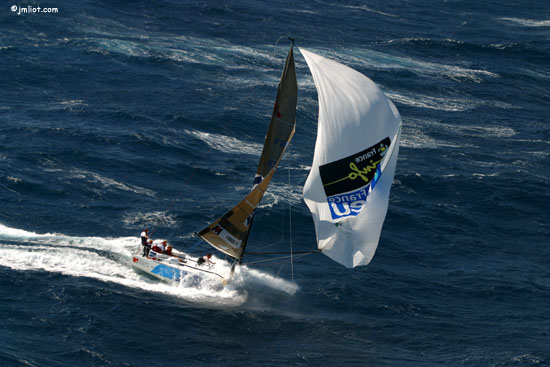
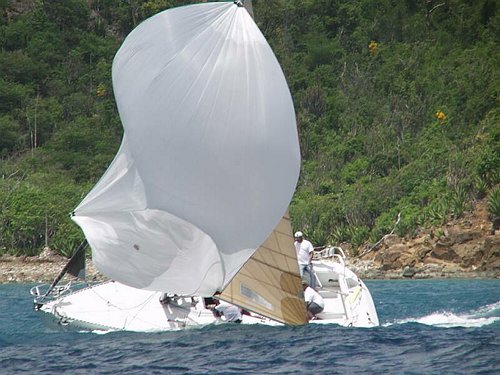
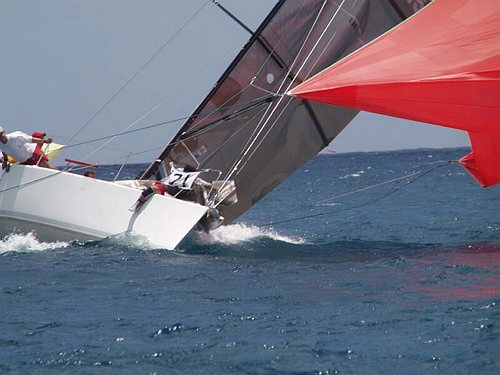
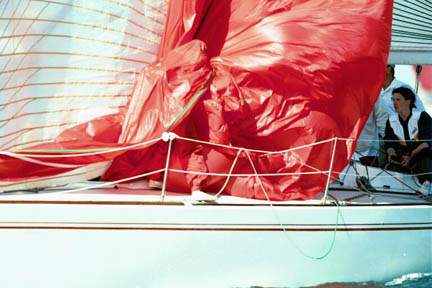
This articles has been floating around the web and reprinted by some yacht clubs. It is an "introduction" to sailboat racing. It claims to be simple but is a bit more detailed than a typical introduction to racing. As far as I know, Captain Kangaroo is a fictional TV character from my youth but that is the author sited in the article. The pictures included in the article on the web are included but are enough to frighten anyone out of every trying racing. If you are new to racing, please do not assume these pictures are anything but the most extreme pictures the fictional Captain impersonator could come up with. If you are an experienced racer, they add humor to the article. See if you can pick out the bowman in the last picture. You can't see much of him, but he is in there. I hope you enjoy the article. Allen
The best way to learn is to get out and do it, preferably for 20 years or so. However, we need some sort of shortcut, so it may help to try writing a description. Most books and articles describing what is done, and by whom, are too jargon filled or otherwise incomprehensible to be useful. So, here goes another try. The goal is to have each person understand at least their job, anticipate when and why things happen, and be able to usefully prioritize tasks. Then you can tell me to shut the f* up, because you already know what you are doing.
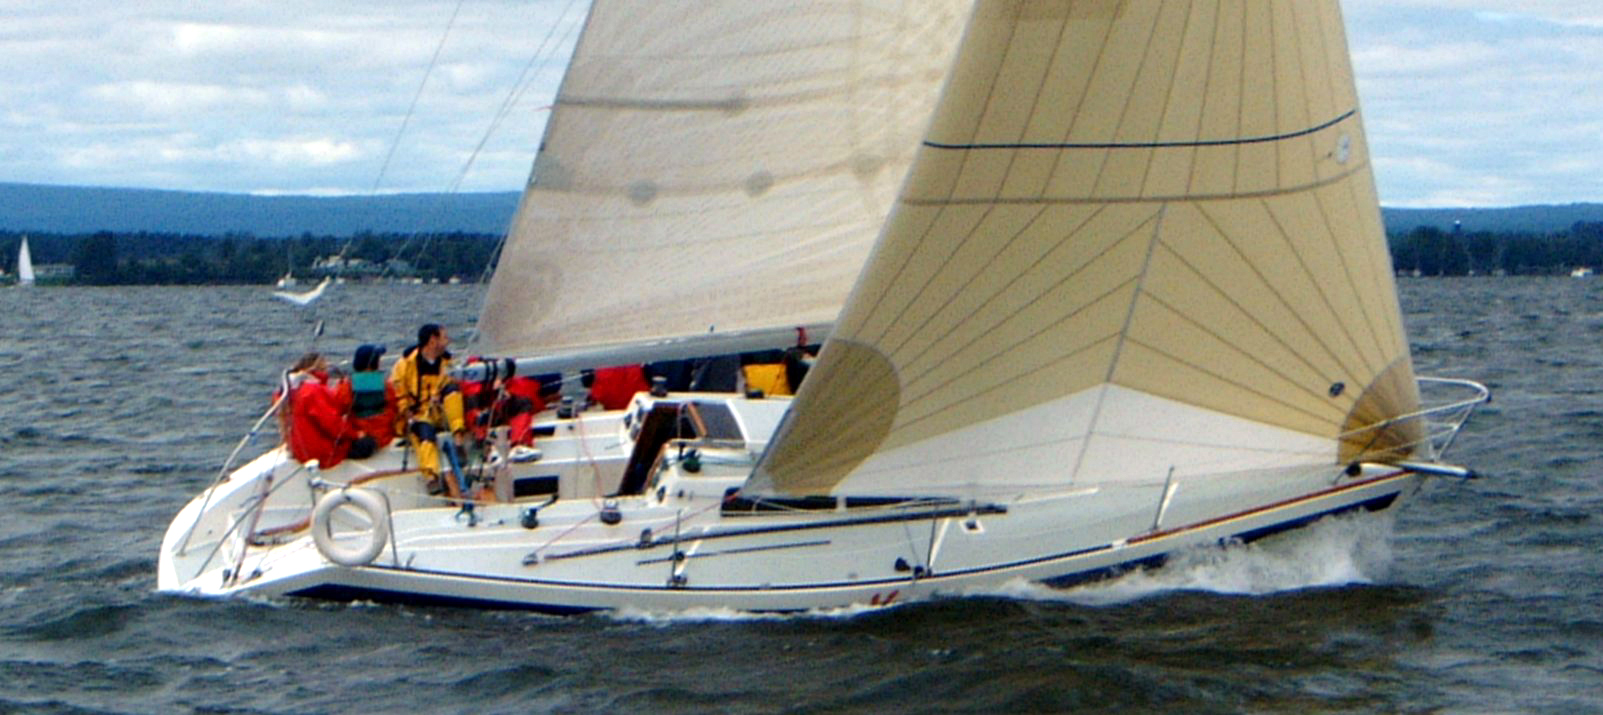
Soverel 33
Big Picture and Strategy
This should help in understanding why and when we are doing each maneuver.
The typical race involves a start line (between the Committee boat on the right and a floating pin buoy on the left), a windward mark (upwind of the start line), and a leeward mark (downwind of the windward mark, but not necessarily the same as the start line). So, the course involves successive legs of sailing upwind, rounding the windward mark, then sailing downwind, rounding the leeward mark, and repeating (sometimes ad nauseum), until you at last cross the finish line.
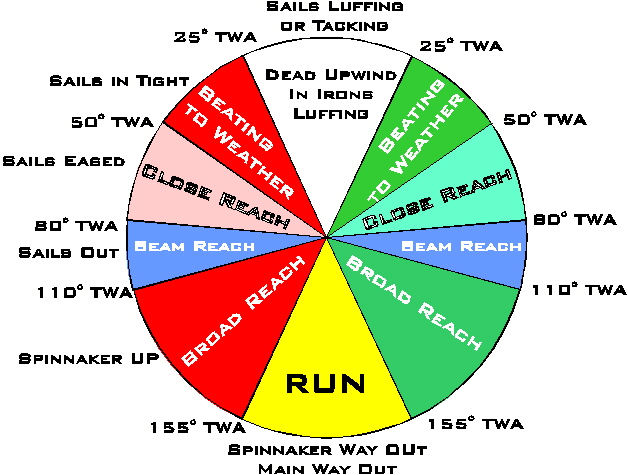
Because we can only sail within about 45 degrees of the (true) wind,1 reaching a windward mark will involve a series of tacks, resulting in a zig-zaggy course. Although we can sail directly downwind, this angle is typically slower than sailing at an angle downwind, exchanging sailing a greater distance for greater boatspeed.2 The result is that we will typically also zig-zag downwind in a series of jibes.
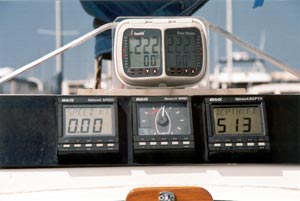
[Wind Instrument (middle)-shows direction of apparent wind]
[Tacktick-shows compass heading and header or lift]
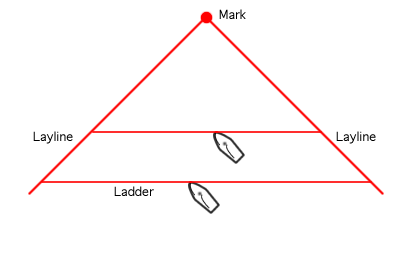
Because of the angles used to approach marks, we can think of the course as bounded by “laylines,” imaginary lines that extend from each mark and describing the fastest course to reach the mark. You generally don’t want to sail past the laylines because that would mean sailing farther than you need to. Thus, there are laylines looking like an inverted 90 degree V (45 degrees on either side) extending downwind of the windward mark, and laylines extending upwind of the leeward mark at about the same angle. So, the course really is the area bounded by these intersecting Vs. You can sail outside of this area, but to do so would be a screwup called “overstanding” the laylines and sailing needless distance.
[Course diagram-laylines]
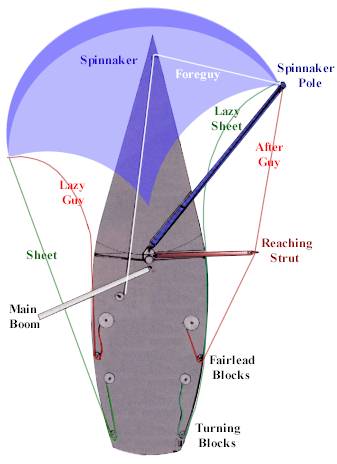
We go upwind with a Genoa or jib (headsail), and downwind (wind more than 90 degrees or so from dead ahead) with a spinnaker, because each configuration is faster for the angle to the wind. Changing from a Genoa to a spinnaker and back is the cause of much merriment, and described more fully below.
[Note: the rest of this section is a bit more advanced, and intended to explain why we are tacking and gybing when we do. You can skip it if you feel so inclined.]
The wind is never really steady. It frequently changes direction and velocity, so we have to deal with that. Regarding velocity, you want to sail where the wind is strongest (duh). So, keep an eye out on the water for “wind lines,” which are differences in color and ripples that distinguish more windy areas (darker color, more ripples) from less windy (lighter, more glassy). This is particularly key when the wind is light.
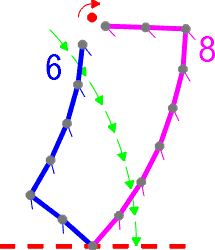
Direction changes are more complicated. There are two reasons to pay attention, and try to anticipate, direction shifts. First, by sailing on the “lifted” tack rather than the “headed” tack, you travel a shorter distance.
Lift? Header? Say what? Imagine we are sailing along close-hauled on port tack (i.e., wind coming over the port side, boom sticking out on starboard, and the wind indicator needle3 at about 11 o’clock indicating that we can’t sail any higher into the wind). Now we look at the compass and it says 0 degrees (due north). A few minutes later we are still close hauled, but the compass says 20 degrees. This means that the wind has shifted right (“veered”) 20 degrees since we last looked, and we have been “headed” 20 degrees. Similarly, if the compass had instead showed 340 degrees, the wind would have shifted left (“backed”) 20 degrees, and we would have been “lifted” 20 degrees. Lifted means that we are now pointing more directly toward the windward mark, while headed means that we are now pointing less directly at the windward mark. If we had been on starboard tack instead of port, everything would have been reversed; rightward wind shifts would be headers, and leftward lifts. If you always sail on the lifted side, you travel less distance to a windward mark than if you sail on the headed side.
[Advantage of sailing on lifted tack]
At significant risk of complicating things further, downwind is exactly the opposite. Lifts take you further away from the mark, while headers point you more toward the mark. So, the rule is, “tack on headers, jibe on lifts,” and the goal is to get “in phase” with oscillating wind shifts.
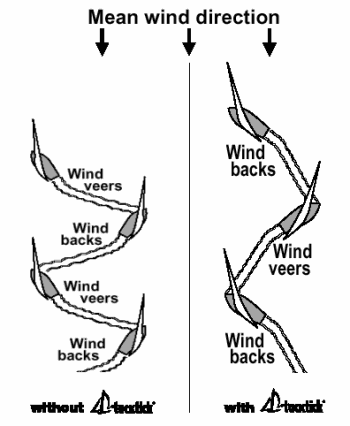
So, headers and lifts are important, but how do you spot them? Our electronic compass gizmo, called a Tacktick, keeps track of our course relative to a previous setting. So, it indicates whether we are headed or lifted, and by how many degrees, relative to the last time we hit the “set” button. Or, you can simply remember the previous compass headings and observe whether the current (still close hauled) course is higher or lower. Frequently, the oscillations follow a regular time pattern, so if you can see that it shifts back and forth every few minutes, you can use that to anticipate the next one. A really good way to spot shifts is to watch the boats ahead to see if they are pointing higher or lower than we are. It is a good bet that we will be pointing the same as them once we get there. Another way, that requires a good eye, is to look for approaching dark patches on the water caused by puffs; those that are approaching from dead ahead are likely headers, those that appear to be crossing our course are likely lifts. Polarized sunglasses help.
The other reason for paying attention to wind shifts has to do with what happens to relative positions of boats when the shift happens. Imagine that we are way on the left side of the course and our competitor is on the right, and we each have an equal distance to the windward mark (but obviously from opposite sides). Now, the wind shifts right. As both boats twist to the right to follow the wind, we would fall in behind boats to the right. Alternatively, if the wind shifted left, they would fall in behind us. The further apart the boats are, the greater the effect. These kinds of relative position changes can be huge, so being on the right side of a shift can overcome lots of boatspeed difference.
[Advantage of sailing to inside of a Persistent Shift]
There are a few strategy rules that come out of this. First, if you think the wind will go right, be on the right side of the course, and vice versa. Second, the effect is amplified by distance (“leverage”) between boats, so if you are behind, get far away from the competition, but if ahead get close. Third, crossing paths with another boat consolidates that position, so if you get a lead, try to cross their bow, but if you lose a lead, don’t let them cross your bow (stay away until the wind shifts back).
This was supposed to be simple. Let’s get back to what to do on the boat.
Housekeeping
As you may have noticed, there are a lot of ropes, winches, blocks, stoppers and other doohickeys on the boat. The spaghetti factor can get out of hand if we don’t do a little housekeeping once in a while.
Winch handles should always be either in the winch socket or in their pockets-nowhere else. This keeps them from going over the side, and you know right where they are when you need them. Winches are two speed, wind it backward for the lower gear ratio when the going gets tough.
All the halyards and other lines that lead to the cabin top can be chucked down the companionway into the cabin when not in use to keep them out of the mess on the cockpit floor. However, they can get tangled down there, so it is a good idea to “flake” halyards just before you need to use them (such as just before dousing the spinnaker or dropping the jib). “Flaking” means to loosely coil, without twisting, a line to make sure that it isn’t knotted around itself or anything else. When you lay them down, make sure that they uncoil from the top, and big loops are better than small ones.
Jib sheets also need to run free, so flaking them is also good practice. Also, “butt cleats” (sitting or standing on the sheet to deprive it of its freedom), “assholes” (the tiny little loops that sometimes form in a too tightly coiled line and cause knots or jams at blocks), “rats nests” (self explanatory), and other messes are to be avoided. Murphy’s law is particularly powerful in this department.
Jib sheets should be wound at least two, three when the going gets tough, times clockwise around the winch. The “lazy” (not working at the moment because the sail is sheeted on the other side) sheet should generally be loaded on the winch to be ready for a quick tack. Also, be careful that you are actually grabbing the jib sheet (they’re blue), rather than some other thing floating around in the general area.
Be careful to keep loose lines away from working winches, because the loose lines can get sucked into the wraps and make a big mess. Other loose lines, such as jib sheets, spinnaker sheets and spinnaker guys, can drag overboard if not secured.
There are several types of shackles on the boat. Snap shackles (jib tack, spin and jib halyards, afterguys, topping lift, foreguy) have a pin with a pigtail attached that can be pulled to release it or close it. Always check that the pin is seated before trusting that a snap shackle is secured. Trigger shackles (spinnaker sheets) have a trigger, reached through a hole just behind the jaws of the shackle, so they can be opened either by your finger or the fid (special shackle opening tool) inserted into the trigger hole. It is a good idea to familiarize yourself with how the shackles work in advance.
Beer and sandwiches are in the cooler-help yourself.
Right of Way Rules
These are good to know because they affect strategy and tactics on the course, most obviously at the start and mark roundings. There are basically three, with a few complications thrown in for the start and in the vicinity of marks.
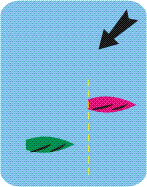
Rule #1 is that a port tack boat must give way to a
starboard tack boat (the red boat in the diagram has right of way
over the green boat). This rule is importantly in play on the start,
where just about everybody starts on starboard to retain right of
way. After the start, it affects crossing situations.

At mark roundings, a port tack boat can have a tough time finding room to jam in there, particularly at the windward mark where a parade of starboard tackers usually forms on the layline.
Rule #2 applies when boats are on the same tack, the
windward boat must give way to the leeward boat (the red boat has
right of way over the green boat).

So, you can’t come down on another boat, but you can “luff up” an opponent. On starts, the leeward boat can luff up an opponent, even push them over the starting line early. Before the gun, you can go so far as to point head-to-wind to luff an opponent, but once the gun goes off you can only point as high as “proper course,” defined as the fastest way to the starting line.
On the course, this is an important rule on downwind legs, where you can defend against an overtaking boat trying to get into your wind by pointing higher. However, once you reach the layline you have to go to a “proper course,” and have to stop driving your competitor up higher than he wants to go.
Rule #3 is that an overtaking boat has to give way to
the overtaken boat; just like on the 405, you aren’t supposed
to rear-end another boat (red boat has right of way over green boat).
This rule creates an interesting situation when interacting with the second rule. Say you are overtaking a same-tack boat ahead, that boat could defend by keeping his stern just ahead of you to prevent you from passing. However, once the overtaking boat gets his bow overlapped (past) the stern of the boat ahead, the second rule applies, and the leeward boat has right of way. So, once the overtaking boat overlaps to leeward, right of way would abruptly shift from the overtaken boat to the overtaking boat, creating an opportunity for a particularly nasty overtaking skipper to simply head up and foul (i.e., hit) the boat ahead as soon as an overlap is established. Therefore, the racing rules have been modified to require that an overtaking boat cannot luff up an overtaken boat when the overlap is established from astern.
Finally, there are special racing rules regarding buoy room at marks. When two boats are overlapped within two boat lengths of a mark, the outside boat must give the inside boat room at the mark. In other words, you can’t force the inside boat to hit the mark. This right is established at the two boat length circle, and stays locked-in even if the overlap is broken once inside the circle. Also, a boat must sail a “proper course” around a mark. This means that you can’t use your position to drive competitors further off the course, but must sail the fastest course around the mark, or the course you would sail if the competitor weren’t there. For example, you can’t push a competitor past the layline.
The Division of Labor
The following is adapted from Steve Steiner’s “Crew Positions 101.”
There are Seven Critical Positions on a racing Yacht:
Helmsman / Skipper
Tactician
Maintrimmer
Port
Trimmer
Starboard Trimmer
Mastman/Pitman
Bowman (Foredeck)
We don’t always, or even usually, have 7 on the boat, or even the same people. Therefore, we can’t afford too much specialization, and it is good to also have some idea what other positions do so we can combine or switch positions as necessary. We will often have to combine positions, and we have so far totally done without a tactician (I look forward to having such a luxury), leaving us with six sailing positions. When we sail with five, we will have to combine some of the mastman and genoa trimmer positions, and have others pitch in at critical moments. Four makes it tough, because each person will have to do a number of tasks, with the mastman tasks also jointly handled by the main trimmer and genoa trimmer.
The following are all the basic maneuvers, with some step-by-step explanations. There is a first step that applies to all the maneuvers, which is to think through in advance what is about to happen, and make sure all the various strings and things are clear and ready to go.
The Start (typical starboard approach)
Overview- The idea is to hit
the start line right at the gun, usually on starboard tack to
preserve right of way. Ideally, you hit the line with speed and/or
room to bear off for speed, and have room to tack to clear air. What
you don’t want to do is get pinched right to windward of
another boat, or trapped under bad air from boats to windward or
ahead. You have to be aggressive in insisting on your right of way,
because other boats will attempt to fit into any holes on the
starting line that are left unguarded. The start sequence is usually
5 minutes long.
Helmsman -
Get a good position in the fleet with room to duck and come up
Tactician - Check
wind shifts and determine the favored side of line and course. Set
timer by the guns. Call Time.
Maintrimmer
- Keep main trimmed fully unless told
otherwise. Deal with running backstays on tacks or jibes. Be ready to
dump the entire sail if necessary. Trim hard and fast on final
approach giving the boat full power.
Port
Trimmer - Let Helmsman know of leeward boats.
Grind for Starboard Trimmer on Port Tack. Trim to full speed unless
told otherwise. Remind the foredeck to skirt the Genoa on final
approach. Use your position on the low side to spot threatening
opponents and launch obscenities at them.
Starboard
Trimmer - Let Helmsman know of leeward boats
while on port tack. Trim to full speed. Grind for port trimmer.
Preload starboard winch. Get to rail at gun.
Mast
Man - Call Time. Get to rail. Watch for kelp.
Stare down other boats-look like you mean business and/or are
uninsured.
Bowman -
On bow calling approaching boats and distances (hold up fingers for
number of boatlengths) to the line. Yell “starboard” and
glare menacingly at any approaching port-tackers. Don't forget genoa
skirting.
Upwind Leg-Tacking
Overview-
We will tack to take advantage of wind shifts, consolidate gains,
deal with crossing/right-of-way situations, or to position ourselves
for mark roundings. You can make big gains if you tack at the right
times and smoothly.
Helmsman -
Call “Ready Tack,” then "Helm’s Alee".
Make smooth turn. Use windex or wind instrument to quickly find the
opposite tack angle after crossing head to wind; don’t
overturn. Accelerate by pinning the telltales back, then start coming
up as speed builds to best pointing angle.
Tactician
– Keep track of course to windward
mark. Look for a clear lane. Watch for wind and kelp. Keep track of
headers and lifts and positions of other boats.
Maintrimmer
- Ease traveler to keep boat from heeling
more than 20 degrees. Release the running back as the boat goes head
to wind, then snug up the opposite running back. Then trim (usually
using the traveler to bring the boom to centerline) as the boat
accelerates. Shift from power to pointing mode as boat accelerates.
Existing Trimmer -
Cut Sheet as boat gets head to wind-make sure it runs free. Grind for
New Trimmer. Get to Rail.
New Trimmer -
Tail sheet. Trim in until sail is about a foot off spreader. Fine
tune trim as boat accelerates.
Mastman -
Adjust Halyards, outhaul or cunningham if needed. Get to rail. Look
for kelp.
Bowman -
Help Genoa across (this is important to a smooth tack-sometimes you
will have to give the lazy sheet a yank). Skirt genoa. Get to rail.
Windward Mark Rounding - (standard port bearaway spinnaker launch)
Overview-
We launch the spinnaker just after rounding the windward mark, and
take down the genoa (because it interferes with the spinnaker’s
airflow). The keys to a good launch are: 1) well packed spinnaker;
2) spinnaker on deck and hooked up well in advance; 3) pole in proper
position (about 5 feet off deck and 30 degrees back from bow); 4) all
lines led correctly and not trapped under lifelines or
sheets.
Helmsman - Watch
traffic. Help fill chute before bearing away completely. Find new
course angle. Preserve passing lane, possibly heading high a few boat
lengths after rounding.
Tactician -
Determine favored side of the course. Provide new course bearing to
helmsman. Help find optimum VMG angle.
Maintrimmer
- Ease Mainsail (starting with the traveler,
moving to the sheet after the traveler is all the way out) to
maintain flow across the sail as the boat rounds the mark and finds
the new course. Once around the mark, ease backstay, outhaul, and
cunningham to make the sail fuller and more powerful. Apply some boom
vang to keep the boom from lifting and the leech from
twisting/spilling too much air, but leave some twist so that there is
airflow across the head of the sail.
Port
Trimmer – Don’t really ease Genoa
much as the mark is rounded- Over easing the genoa causes problems
for the spinnaker hoisting. Leave the spinnaker sheet slack as the
chute is going up because this interferes with hoisting. Trim and
fill the spinnaker once it is fully hoisted.
Starboard
Trimmer – As the mark approaches, pull
back the afterguy some to “pre-load” prior to launch-this
gets the clew of the spinnaker out of the bag and helps open the sail
up on launch. As the spinnaker is launched, trim the afterguy to get
the pole about 30 degrees off the bow (if you have been able to
already pre-feed it there, so much the better). Most spinnaker wraps
are caused because the afterguy is late in coming back allowing the
chute to twist behind the genoa. Once the chute is up and filled,
trim the pole to square (perpendicular) to the wind as the boat finds
its new course. Tighten the foreguy once the pole is set
(note-trimming the pole back will require loosening the foreguy, and
the foreguy will have to be retightened after easing the pole
forward. Once the spinnaker is flying, compare the height of the
clews off the water, and raise or lower the pole height to get them
about even height. Continue adjusting pole fore/aft angle to keep
the wind perpendicular to the pole as the course changes.
Pitman
– Before rounding, make sure that the
genoa halyard is clear, so the genoa can be dropped as soon as the
spinnaker is up and flying. Use the topping lift to raise the
spinnaker pole when the bowman asks for it. Release the halyard and
drop the Genoa when the bowman asks for it. Work with the afterguy
trimmer to get the pole perpendicular to the wind, easing the foreguy
to let the pole come back, then snug up the Foreguy to keep the pole
from bouncing. Help the main trimmer to adjust the outhaul and
cunningham.
Bowman –
Before the rounding, attach the spinnaker bag to the port lifelines
when convenient (usually on the last port tack leg), then attach the
halyard and sheets/afterguys. Double check to make sure to check
that the sheets/afterguys are clear and the shackles are properly
attached. On the last starboard leg, work with the mastman to raise
the pole to about head high. Use the afterguy to preload the clew to
near the pole-this will help the spinnaker open so it goes up without
wrapping. At the skippers “launch” signal, jump the
spinnaker halyard, make sure the spinnaker is all the way up, then
signal the trimmers to get it flying and adjust the pole. Signal the
mastman to let the genoa down, and secure the genoa on deck. Take
the spinnaker bag off the rail and toss it down the hatch.

Gybing
Overview-
The key to preparing for the gybe is to get the boat nearly dead
downwind, with the pole perpendicular to the wind (as usual), which
should put the new afterguy in reach of the bowman and the spinnaker
reasonably soft. During the gybe, the key is to keep the spinnaker
flying in front of the boat, even when the pole is off. It sometimes
helps to have a crewman act as a “human spinnaker pole”,
holding the sheet out and low by hand to keep the sail flying. After
the pole is made, the mainsail is gybed and the whole setup can be
trimmed for the new course.
Helmsman -
A book can be written on the subject of driving through the gybe. A
good helmsman develops a feel for the boat in every sea and wind
condition. If the helmsman can call the gybe in a puff, on the roll
of the sea he can accelerate during the maneuver and gain time on his
opponents during the gybe. “Trip” should be called by the
helmsman just as the boat rolls to windward.
Tactician
- Look for clear air to gybe into. Make sure
that you won't have to duck or head up around any boats just after
the Gybe. On many boats, the wind speed is as important as the wind
angle; so avoid holes if possible (you will have to look backward to
see stronger wind and shifts approaching).
Maintrimmer
- The safest way is to bring the main to
center and then ease it out on the other side as the pole is made on
the new side. Release the running back before the main crosses the
center line-letting a loaded sail bang into a loaded runner puts a
big strain on the mast-and snug up the opposite runner after the gybe
is complete. A faster way is to wait for the trip call, release the
runner, and throw it around as the boat rocks to windward. If done
properly the boat stays at full speed the entire time. If done
improperly on a boat with a tall fractional rig and runners, can
result in the total annihilation of the rig, the boat, and all life
as we know it.
Trimmers –
The object is to keep the spinnaker full and trimmed at all times.
One trimmer handles both sheets, the other handles both afterguys. As
the helmsman brings the boat down (so the wind is nearly directly
behind the boat) in preparation for the gybe, the pole should be
“squared” to keep it perpendicular to the wind. This
means the afterguy trimmer pulls the pole back (working with the
mastman easing the foreguy), while the sheet trimmer eases out to
keep the spinnaker flying and in front of the boat. The spinnaker
should end up with the sheet clew near the forestay and the pole
nearly square to the boat-this is the perfect position to begin the
gybe. At the “trip” command, the afterguy trimmer eases
the afterguy, and the sheet trimmer takes up (some) of the resulting
slack, so we end up with the sheet trimmer free-flying the spinnaker
using both sheets, Ben-Hur style, and the afterguys loose. The sheet
trimmer will have to use both sheets to keep the spinnaker in front
of the boat, with an emphasis on keeping things loose (if the sail
starts to go right, ease the right sheet and pull in the left, and
vice versa). It is important not to let the sail fly out to one side
of the boat, across the forestay, because this often causes an
hourglass style wrap. As the pole is tripped, pull a little on the
new sheet to prevent the chute from darting to the new windward side.
When the bowman attaches the pole to the new afterguy and yells
“made,” the sheet trimmer should ease the sheet slightly,
and the afterguy trimmer should trim the pole back to perpendicular
to the wind. The new afterguy must be pulled back as fast as
possible to avoid wrapping the chute, but don't over square or pull
before the bowman calls made.
Mastman –
Ease the foreguy in preparation for the pole being trimmed back (it
is important that the bowman has enough maneuvering room to move the
pole around without the foreguy restraining it). Snug up the foreguy
as the pole comes forward after the gybe.
Bowman
- Timing, speed, and agility are required for
this daring maneuver. At the “trip” command, the pole
ideally should be tripped from both sides at once, freeing the pole
to move to the new side, but it often has to be tripped at the
inboard end first. Grab the new guy with your outboard hand and shove
it into the jaw of the pole that you are holding with your inboard
hand. Then slide the pole through your hands and push it outwards
(and forward if you can) with all you have till you can make the jaw
onto the mast ring. Call Made
and prepare for the next gybe or mark rounding. Don't worry about the
genoa sheets until the final gybe to the mark. Then, you may have to
re-string the genoa sheets to make sure that they will be free to
pass over the pole once it is dropped to the deck.
Leeward Mark Roundings (Spinnaker Drop)
Overview-
Two entirely separate things are happening at the leeward rounding,
so it is good to divide into two separate teams. One team
concentrates on getting the Genoa back up and taking down the
spinnaker before the mark rounding. The second team concentrates on
getting the boat steered around the mark and quickly up to close
hauled and trimmed for the next upwind leg. Because even a smooth
spinnaker takedown involves some degree of mayhem – sails
flapping and people running around – it is important for the
mark rounding crew to essentially ignore the Keystone Cops episode of
the takedown crew and concentrate on getting the boat maneuvered
through traffic and going upwind. After the rounding, the foredeck
has to be cleaned up (get the pole down and the Genoa sheets clear of
the spinnaker pole and halyards) to make the boat ready to
tack.
Helmsman and Tactician -
It is critical to call the drop at the appropriate time. Too soon and
you might lose an inside overlap. Too late and the spinnaker can be
left flailing in the breeze as you're trying to go to weather. [Note:
our experiences here lead me to vote for dropping early] Once you
have called for the genoa up and then
spinnaker drop, the Helmsman should give all attention to driving
properly around the mark. The Tactician must start looking up the
weather leg before getting to the leeward mark to determine what side
of the course will be favored. If the crew work goes well the
Tactician can sit back and do his job. If something goes wrong on the
takedown, the Tactician becomes the extra hand to assess the problem
and help with the solution. There are no tactics when you can't
tack.
Maintrimmer -
Set your mainsail controls for the coming windward leg before
you get to the two boatlength circle; this means trimming in the
outhaul, cunningham, and backstay (it is a lot easier before they are
under pressure). Trim well because the main is the driving force
during the sail transition. As the mark is rounded, trim in the
mainsheet and traveler to get into optimum upwind trim. Try to
ignore any mayhem going on with the spinnaker douse and concentrate
on finding the best windward trim. Once that is accomplished, you
can help gather in the spinnaker.
Trimmers
– One trimmer concentrates on trimming
the genoa to full speed through the entire rounding, while the other
assists in dropping and securing the spinnaker. On the standard
leeward drop, the spinnaker trimmer eases the pole just to the
headstay, allowing the bowman to “spike” (release) the
shackle holding the clew to the pole. Then, the trimmer can haul in
the spinnaker on the low side of the boat using the sheet as a
starting point. After the spinnaker is bundled onto the boat, remove
the sheets and hook the shackles together, remove the halyard and
hand it to the bowman, and stuff the spinnaker down the companionway
hatch.
Mastman - You must go with
the flow of the foredeck crew. Before the drop, make sure that your
spinnaker halyard is ready to run free. Hoist the genoa as soon as it
is called for and tension the halyard. Once the bowman spikes the
shackle, lower the spinnaker halyard as fast as the crew can pull the
spinnaker aboard (it usually works well to let about a third down
right away, then only as fast as they can grab it). As soon as the
bowman calls for it, ease the topping lift to the deck. This allows
the Bowman to start cleaning up the foredeck immediately for a tack.
Once the pole is on the deck, help the trimmer get the spinnaker
unshackled and secured below. Then get to the rail and watch for
kelp.
Bowman – Well
in advance of the rounding, make sure the genoa is ready to hoist (on
the proper side of the deck and the sheets will run over the pole
once it is dropped to the deck). Jump the genoa halyard on the
command to raise the genoa. On the “drop” command, go to
the bow of the boat, where the pole is just against the forestay, and
use the fid (a blue, pointy tool that fits into the trigger on the
spinnaker sheet shackles) to “spike” (release) the
spinnaker clew. Help the trimmer get the spinnaker under control and
in the boat. It should only take 4 to 6 seconds to pull down a
spinnaker on any boat up to 70 feet long, if done properly. Once the
spinnaker is controlled, ask the mastman to ease the topping lift,
lower the pole to the deck, secure the pole and do the minimum
cleanup required to get the boat heading quickly to the next mark.
Double check the windward genoa sheet to make sure it won’t be
trapped under the pole or halyards in a tack. Do the rest of the
cleanup when the boat is in clear air and sailing at full speed.
Sail Trim
Boatspeed is, obviously, pretty critical to success. There are a lot of books on the subject. (Dead links removed. See other articles on racing under the RACING tab. AE)
The basic idea is to shape the sail for the wind/sea conditions. A fuller sail has more power, and is better for light winds and/or choppy seas. A flatter sail is better in stronger wind/flatter seas. You also “shift gears.” A fuller sail is used to accelerate, and the sail is gradually flattened as speed builds.
In stronger wind, to flatten the main you tighten the outhaul, backstay, and cunningham (and possibly ease the checkstay relative to the running backstay). You can also ease the sheet to allow the top of the main to twist off and release power. Then, you set the angle of attack with the traveler, try to get the telltales on the leech flying, easing the traveler when the boat heels too much (more than 20 degrees). Conversely, in light air let the outhaul off to introduce some shape to the bottom of the sail, ease the cunningham and use less backstay. From this basic setup, it pays to experiment to see what is fast. Use the knotmeter and talk to the helmsman-too much or too little power from the main is very noticeable on the helm.
For the Genoa, fullness is primarily controlled by halyard and running backstay tension. Tighten the halyard and runner in strong wind, ease them in light. The twist is controlled by the jib lead. If the top is luffing relative to the foot, pull the lead forward. When the opposite occurs, or when you need to depower the genoa, move the lead back. Trimming is a matter of using the sheet to get all the telltales streaming. Note: the helmsman will try to pin the telltales straight back when accelerating, but will then head up and mostly sail with the windward telltales slightly lifting-this gives a better tradeoff between speed and pointing to windward. Feel free to experiment to increase speed-use the knotmeter to assess each change.
Spinnaker trim involves getting the pole perpendicular to the wind (use the shroud telltales), and the clews about equal height off the water using pole height to adjust. The sail is fastest just as it curls, so it is important to keep it there. Oversheeting the spinnaker makes it look good and behave, but it is slow (of course, collapsed is even slower, so there is a fine line to be maintained). Trimming the spinnaker takes constant attention and adjustment.
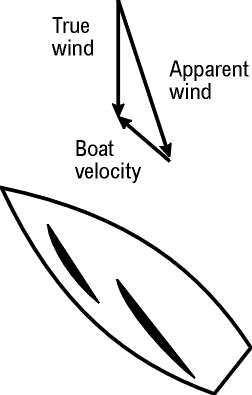
1 Apparent wind is what you feel on the boat (true wind combined with forward progress), while true wind is what you would feel if the boat was not moving. For now, just note that sailing to within about 30 degrees of apparent wind corresponds to about 45 degrees of true wind. Therefore, while it appears that we tack through about 60 degrees (2*30), we actually tack through 90 degrees on the compass (2*45).
2 The goal is to maximize VMG (Velocity Made Good) to the downwind mark. On the lower right hand corner of the GPS display there is a VMG readout. It is a good idea to check this once in a while to fine-tune the trade-off between angle to the mark and boatspeed-i.e. test whether heading up or bearing off increases VMG.
3 The wind indicator is the middle instrument on the display, and looks like the outline of the boat with a needle pointing in the direction of the apparent wind. There are 12 hashmarks around the dial, like a clock, so each one represents 30 degrees.
NOTICE: Some pages have affiliate links to Amazon. As an Amazon Associate, I earn from qualifying purchases. Please read website Cookie, Privacy, and Disclamers by clicking HERE. To contact me click HERE. For my YouTube page click HERE