StartLine
Android Racing Application
Edited 1/30/2015
NEW
StartLine now has a Pebble app? Just search StartLine in the Pebble app store.NEW
StartLine will now interaface to onboard instruments over BlueTooth using the L-36.com Race Box that can be easioly built with $100 to 200 in parts depending on how fancy you want to get. Contact me for details. You don't even need to know how to solder!Preface
StartLine is a very powerful racing app, second only to Expedition. Unlike Expedition, it is free. However, I limit the number users because along with the app comes a huge amount of support both to get the full potential out of the app but also to help users improve their race results. Users must agree to contribute to the StartLine community by providing feedback on results or actually participating in the ongoing development which may just be to ask for new features. You must be serious about racing and commit to put in the time to learn the app. It will improve your race results as it has for the other users. It is a small community but already has a podium finish in a prestigious regatta. Read this somewhat outdated manual below and let me know if you are interested in joining the StartLine team.
Overview
StartLine is a racing app for Android phones and tablets that I developed and sold for a short time. I have continued the development and at this point the new version is "Under Development". Actually, it is stable and winning races, it is just that I will never stop improving it so I say Under Development. I will give anyone who purchased the commercial version a new copy if they just ask. I have also given people who show an interest in helping the development process copies for testing. Everyone who gets a copy has sent me an e-mail explaining how they will meet the terms and conditions of the software as well as agree to give feedback on how it works for them. I used it last season in our club races. There are lots of reasons we did well and I would say the racing helped my app development more than the app helped my racing but we did win 80% of the races.
I use this myself and my crew uses it. This page documents the latest version for those who are interested. Please feel free to comment. Note that at this point I have no plans to ever sell the program again. I will give it away as stated above. I do reserve the right to sell it in the future if I change my mind.
Fundamentally, StartLine helps you get a good start by telling you the best it can how long it will take you to get to the line assuming you are traveling at a target speed and direction. If you have calibrated your approach, you would know how long it will take you to get into that target situation so you might, for example, reach down the line knowing that with 4 seconds to burn you need to harden up and go for the line. The fundamental readout, besides time to the start, is time to burn. That is the difference between the seconds to the start and the seconds it would take you to get to the line at your target speed and direction. The latest version also has the ability to compensate for boat speeds that are different than your target so that if you, for example, need to slow the boat down during the pre-start, that is taken into account.
There are some new features incorporated into StartLine that are somewhat unique and deserve special mention. The Waypoint screen, that shows relative direction and time to the waypoint along with boat speed, now also shows distance to the layline. This layline calculation takes the boat target speed and angle as well as the current into account. There are a series of Wind pages. You can set the true wind by heading the boat either directly into or away from the wind. The unique feature about this is that current is also taken into account. There is a current screen that can be used to measure the current using the boats log and compass or it can be entered from a chart. Wind speed and direction can be used to set start targets if a calibration run cannot be done. Finally, there is a "next leg" screen that will calculate the apparent wind angle for each leg of the race. This can be used to pick the side of the boat for the spinnaker set as well as calculating if you can even fly a spinnaker on that leg.
The remainder of this write up is a page by page description of what the app does. There is a short write up on how to use it at the end.
Section 1 - Operating Manual
Opening Screen and Main Menu
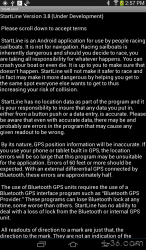
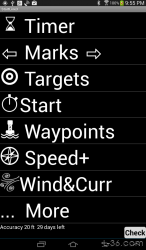
Once you agree, you will be greeted by the main menu. You will return to this menu between other pages.
We will now discuss each option.
Terms
StartLine is an Android application for use by people racing sailboats. It is not for navigation. Racing sailboats is inherently dangerous and should you decide to race, you are taking all responsibility for whatever happens. You can crash your boat or even die. It is up to you to make sure that doesn't happen. StartLine will not make it safer to race and in fact may make it more dangerous by helping you get to the same spot everyone else wants to get to thus increasing your risk of collision.
StartLine has no location data as part of the program and it is your responsibility to insure that any data you put in, either from a button push or a data entry, is accurate. Please be aware that even with accurate data, there may be and probably are errors in the program that may cause any given readout to be wrong.
By its nature, GPS position information will be inaccurate. If you use your phone or tablet built in GPS, the location errors will be so large that this program may be unsuitable for the application. Errors of 60 feet or more should be expected. With an external differential GPS connected by Bluetooth, these errors are approximately half.
The use of Bluetooth GPS units requires the use of a Bluetooth GPS interface program such as "Bluetooth GPS Provider." These programs can lose Bluetooth lock at any time, some worse than others. StartLine has no ability to deal with a loss of lock from the Bluetooth or internal GPS unit.
All readouts of direction to a mark are just that, the direction to the mark. They are not an indication of the direction your boat should go and in most cases you should not and can not follow the indicated direction due either to the wind direction or obstructions. StartLine is not for navigation, it is for racing.
StartLine should only be used after carefully evaluating its usefulness to your application in a safe environment such as a closed parking lot where you can walk around and get familiar with the program.
By pressing the button below, you acknowledge that you have read and understood the above disclaimer.
License
Startline will work for 15 minutes without a license. You cannot use it for racing without a license. Licenses are free but you must qualify to get one. There are no ads and no in app purchases. You must be a serious racer and want to use StartLine to improve your results. I ask that you share what works and what doesn't, interact in developing and testing new capabilities, and basically become a StartLine team member. I also ask that you send an e-mail showing that you understand the terms. The initial license will be for about 30 days. If you are seriously using the app, finding things you want to add, finding any bugs that may be left in there, you will get a permanent license eventually. The app is very stable at this point and had done well in major regattas. There is a page for entering licenses that you will see if you do not have one. Be sure to save the license before continuing.
Timer
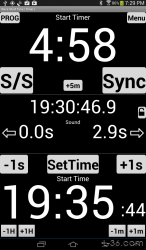
Displays
- Start Timer 4:58 This is the time to the start. It is driven either by programming a start sequence, for example 15 minutes, and pressing the start button, or by just setting the GPS based time that the race is scheduled to start
- 19:36:46.9 This is the current time. The tenths of second should read 0 but may read something else until the GPS unit completely locks on. You do not want to have it read anything other than .0 so I advise turning on the Bluetooth GPS puck 30 minutes before the race start to allow warm up, satellite lock, and WAAS signal transmission.
- 0.0s and 2.9s These two displays are the time it takes sound to go from the respective end of the line to your boat. In this case, I am sitting on the pin and the CB is a km away.
- Start Time 19"35:44 This is the time that the race would start assuming either that the timer is counting down or that you would press the start button at that instant.
Buttons
- PROG will set the start timer to program mode and set it to 0
- +5m will add 5 minutes to the start time. If you are in program mode and have not started the countdown, it will add 5 min for each press of the button. If the timer is running, it will add 5 minutes to the start time.
- S/Swill start or stop the timer.
- Lock will remove all buttons except the Menu button so you don't accidentally change the settings.
- Sync will change the timer to the nearest minute. Hit it when a gun sounds to re-sync the timer.
- -1s will subtract 1 second from the start time and start timer.
- +1s adds 1 second. Use these buttons instead of Sync if you have observed how far off you are.
- SetTime will stop the Start Time from changing and clear the seconds. You can then use the next 4 buttons to set your start time if your RC is using GPS time.
- -1H, +1H, -1m, +1m use to set the Start Time
Setting Marks
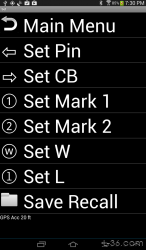
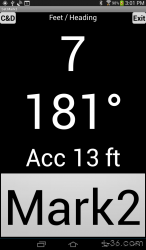
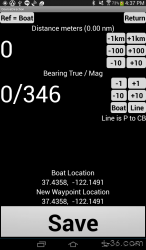
Instead of pinging a mark, you can enter an offset from your present location by entering the course and direction of where you want the new mark to be. The display will show both the magnetic and true bearing. You can use the heading of the line or the course the boat is on as the bearing reference with the buttons provided. Readouts of the new latitude and longitude are in the small font near the save button.
Save Recall Marks
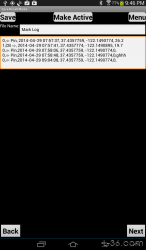
Target Menu
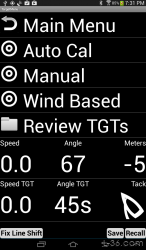
There are four ways to set targets. The preferred way is to do a practice start using the set targets CAL function. You press the CAL button at a critical time in your start sequence. For example, at the point when you switch from a reach to a beat. But whatever it is, you will need to know that exact same corresponding moment during the actual start. Once you cross the line during this practice start, targets and the "Time to Turn" are recorded. During your actual start, this Time to Turn is your target Time to Burn. You can also stop your practice by pressing the button again.
You can set targets manually on the set targets manually page. There you can adjust your boat speed if the conditions change. You can also get to this page from the start screen if you need to make last moment changes. One last moment change you might want to make is to just use the boats actual speed and course at that moment to set the targets. Hitting the use Actuals button twice will set the targets and return you to the start screen.
The final way to set targets is to use the wind and upwind targets. The wind pages, along with the current page, can be used to do this. In this case, targets for port tack and starboard tack are computed and used until you modify them with one of the other ways of setting targets. Then manual targets take over.
A final note on accuracy. My tests show that the distance to the line is within about 10 feet most of the time but might be off as much as 30 feet. You still need to use your eyes for that last boat length! This is based on the accuracy of the GPS system when using a WAAS GPS receiver. StartLine does a lot of correction to get it that close. If you do not use a WAAS or equivalent system, the errors will be about twice as much.
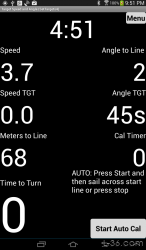
- Start Auto Cal Start the Auto Cal timer and process. You can stop the cal by hitting the button again or by crossing the start line set by the Pin and CB pings. Normally you would press the button, head to the line, and cross it. This would calibrate your starting sequence from the point you pressed the button and give you a readout of the time to burn you should be looking for when you start.
- Top Display reading 4:51 in this example is the time left to the start of the race as set in the Timer screen
- Angle to Line is the angle relative to the starting line where 0 is parallel and 90 is perpendicular. In this display, the boat is reaching down the line.
- Meters to Line is the perpendicular distance to the line from the bow of the boat
- Speed both Actual / Target
- Target Angle to Line and tack This display will show the current setting of targets before starting the cal, then show the current angle to the line, and finally stop on the new cal number, which will be saved.
- Cal Timer times the cal run. The cal must run at least 10 seconds before being stopped manually.
- Time to Turn is the result of the calibration run
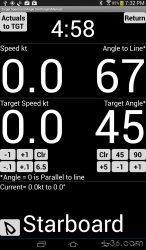
- Top in this case 4:27 is the time to the race start
- Speed kt is boat speed over ground
- Angle to Line is actual angle boat is to the line. This is always a number between 0 and 90 with 0 being parallel to the line and 90 being at right angles to the line.
- Target Speed and Target Angle are the targets
- Actuals to TGT will transfer the boat speed and angle to the line to the target fields
- -, + This buttons adjust the corresponding targets, speed on the left and angle on the right. Speed is adjusted by 0.1 kt and angle by 1 degree.
- clear This will set the target speed to zero, which will cause the start page to use actual speed rather than target speed.
- 6.5 Sets the target speed to 6.5 knots. Happens to be my high wind target speed :-)
- Actuals to TGT will transfer the boat speed and angle to the line to the target field
- -1, +1, +5 will decrease or increase Target Speed by 1 kt, or increase by 5 kt.
- Clr This will set the target angle to zero. When set to zero, the actual angle to the line will be used in the time calculations
- 45, 90 These are two presets that can be used for the target angle
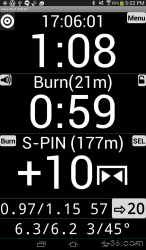
- 17:06:01 The top display is the start time, late afternoon in this example
- 1:08 The upper most of the three large displays is the time to the start
- 21m is the distance to the line (perpendicular distance)
- 0:59 This is the time to burn or the difference between the time to the start and the time it would take you to cross the line if you were on your target heading going your target speed. There is some adjustment if you are not going your target speed (optional) discussed below.
- S-PIN the selected layline is starboard at the pin mark. There are 3 options, Pin, CB, and Mid Line. Port or Starboard approaches are selected in the target screens.
- 177m is the readout of the distance parallel to the startline line to the layline.
- +10 You are 10 second early in getting to the layline so burn 10 seconds. The symbol is showing you are inside the laylines. If you are outside the laylines, the triangles will be outside and pointing away from the layline indication. Both the burn time and burn to layline will turn green if you can go full speed without being early. Green is for go. The button on the left of the header can change this display to time to the layline. It will also change the second display to time to the line.
- .97/1.15 .97 is the actual reach ratio of boat speed to target speed. 1.15 is the expected reach factor. As we are reaching down the line, this indicates something is wrong either with the sail trim or the target or perhaps we are killing time and have slowed the boat down.
- 57 This is an alterniate calculation of burn time. If for some reason your targets are way off, for example the wind died, this may be a better indicator.
- 20This is the time that one end of the line is favored. The arrow indicates which end is favored. This is based on the line heading, the current, and the wind.
- 6.3/6.2 6.3 is the actual boat speed over land and 6.2. is the adjusted target speed, a combination of target speed and actual speed according to the start algorithm. It is the speed actually used in the time calculation and is dependent on the acceleration properties of the boat as set in the Preferences menu.
- 3/45° 3 is the heading (almost parallel to the line). 45 is the target.
- Speaker This symbol is a button that will turn sound off and on.
- Target The target symbol button switches to the Set Targets Manually page.
- SEL This button will cycle through the 3 Layline options: PIN, MID, and CB.
- Time / BurnSwitch the layline display from time to the line to burn time to the line.
- Lock the lock button will disable all the buttons except the lock button and the speaker. If the start page is locked, the waypoint page will be locked after the auto switch over after the start. This allows the use of an arm band to hold a phone without risk of accidentally pressing buttons. The lock buttons require a long press (about a second).
- Wind Page Labeled right arrow, 20, this button takes you to the wind page where you can change the wind direction and recalculate the favored end of the line.
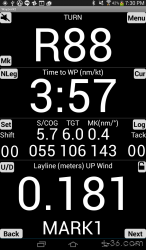
- Turn The first display is Turn, defined by Garmin as the number of degrees your waypoint differs from your heading. In this case, the waypoint is 03 degrees to the right of your heading, basically straight ahead.
- Time to Waypoint The time it will take you to get to the waypoint at your current boat speed assuming you have to tack through your target angles for the point of sail you are on, either upwind or downwind. Of course, if you are heading directly at the waypoint, tacking or gybing is unnecessary. If you are past your target angle, the assumption is you will just turn and head to it. In the case displayed, the waypoint 2 minute 6 seconds away. It is hard to see in the picture, but the distance to the waypoint is displayed in the title but probably only useful in getting used to the app while walking around as the font is small.
- Speed Boat speed over ground. In the screen shown, the boat is going 6.9 knots over ground and the target boat speed is 6.2 knots through the water. The difference may be due to current. The course is shown in small letters in the lower right.
- Distance To Layline The distance to the layline is 0.235 nautical miles. In this case, with an unwind leg and 90 degrees TURN but heading to the mark, the layline is the mark. The smallest readout, .001 nautical miles is about 2 meters. The units do not switch near the mark so that there is no confusing as to what the units are. The tack angles are calculated from the boat Polars.
- Waypoint The smaller display at the very bottom is the waypoint name you are heading toward. It can be either a pinged waypoint or one from the waypoint list. It can either be selected automatically, or with the NEXT or Back buttons.
- Shift resets when you tack and will show wind shifts, right or left
- L Tack shows the angle over ground of your last tack. Keeping track of these can help you pick the TURN reading so you can tack right on the layline.
- Speaker Turns sound on and off
- Route Used to select the route from the Route screen
- U/D Upwind and Downwind are selected automatically based on the wind direction. You can override this with this button. There are upwind and downwind targets and the tacking or gybing angle are used depending on the direction of travel.
- Next and Back Cycle through the waypoints for this route. If no route is selected, cycles through all the waypoints for the waypoint file in use. Only the pinged waypoints that have been setup are included.
- Current Go the the screen to set the current.
- Next Leg button will take you quickly to the Next Leg screen where you can calculate the apparent wind angle for future legs.
- Lock Disables all buttons except lock and speaker. Useful if wearing a phone in an arm band to prevent accidental button presses.
- U/D The Up-Down button can be used to manually lock the course as wither upwind or downwind. This determines which targets are used. This is normally done automatically but can be overridden if the wind is not set correctly.
- Log Show a log page of the previous tacks, their target angles and actual.
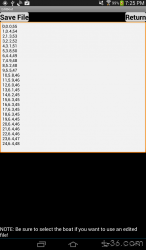
- The Bow Offset is the distance from the GPS receiver to the bow of the boat. A caution, when walking around to get familiar with the app, it is best to set this to 0. It gets very confusing otherwise.
- The Hull offset is the distance from the GPS to the side of the boat.
- Stern offset is from the GPS to the furthest point on the stern, or whatever you want to be the reference point when you are crossing the line from the course side.
- Extra distance allows you to create a safety margin so that StartLine is telling you to be late by this amount (or early if you put in a negative distance.
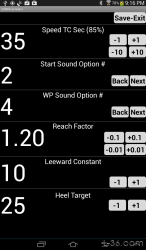
- Speed Time Constant This parameter is used to adjust the target speed for the case when the boat is not moving at its target speed. For example, if you have to slow the boat down to kill time, this parameter helps to compensate for the additional time over the time it would take at just your target speed. You still need to compensate for any turns or radical maneuvers you will be making. Hopefully these were taken into account during the Set Targets Cal routine but sometimes in races things change so knowing your boat and the time it takes to move around is important. This is a new feature of the program and has not been race tested. It might take some experimentation to know the time constant of your boat but as a model, one time constant is about the time it takes to get to 60% of your final speed.
- Sound Option The Start There are options on what is announced when on the start screen. 0 is sound off. At the time I am writing this, there are two options, 1 and 2. We are using option 2.
- Waypoint Sound has a number of options. As I write this there are 6 options. You can enter values above 6 which will effectively cause speech to be off. Try the different options and see if there is one you like. If what you want is not there, let me know and I will add it.
- Reach Factor The last parameter is the reach factor. The speed that is used when calculating time to the layline is the target speed times this factor. For a beating start, try 1.2 as the factor. For other starts, you need to do some calculations to pick a factor. Just figure out if you will be going faster or slower than your target speed during the prestart and enter that number here.
- Leeward Constant This is an industry standard constant. 10 is a reasonable number to start with.
- Heel TargetThis is your normal high wind target heel. The program will adjust the heel down as the wind decreases.
- Does it matter what direction I go when I ping the line?
No. StartLine uses velocity corrected position so that it is reading out where you are, not where you were like most GPS systems. It does, however, matter that you are heading in a straight line. Don't make a sharp turn just before or after you ping. Allow at least one full second on each side of your ping. - What is the best way to sync the clock to the gun?
You can use the Sync button to move the time to the nearest minute but there is a better way. Just observe how far off you are and change the start time directly. Here is an example. If you start time is 12:05 and you get the 5 minute gun and you read 12:00:04 you are four seconds late. All you need to do is hit the -1s button 4 times. But if you are some distance from the CB, it might take some time for the sound to get to you. You can read that out on the timer screen under "Sound". If you are 1 second from the CB at the speed of sound, then you would only be 3 seconds late as you would want your clock to read 12:00:01 when you finally hear the gun. Remember that the resolution on the GPS clock is one second which means you need to know if the start will be right on when the readout changes, or a fraction earlier or later. It is difficult to set any clock to the exact time of the start and that is why Denis Conner recommends that you not re0sync your start timer but just remember how far off it is. With StartLine, you can reset the seconds without actually having to hit any button at just the right time. - When should I tack on the Layline?
The Waypoint screen will show distance to the layline assuming you have good upwind and downwind targets entered. The auto generated ones will get you close. If you are doing several tacks on a leg, it is better to look at the "L Tack" measurement for several of the tacks and then use that value for the TURN reading to indicate the layline. The Last Tack readout reads tack angle over land so automatically takes current, sail trim, waves, and wind into account. - How is the time to the waypoint calculated?
The time to the waypoint assumes you are going to tack or gybe at your target angles to get to the waypoint. If you have overstayed the layline, it assumes you will immediately turn and head straight to the waypoint. - How are the generic polars and targets generated and how accurate are they?
The Upwind targets are very good if you get the boat type and one point correct. They were developed looking at a variety of boats from a Catalina 22 to a TP52 and generally held to the standard polars within a 1/10 knot. The downwind and polar tables are less accurate. The polar tables are mainly used in the next leg calculation of apparent wind angle and are plenty accurate for that. More accurate polars might give readings that differ by a degree or two but that just is not going to be noticeable. The downwind targets are not very accurate because boats vary so much. They are used for determining the layline when going down wind. In a sample test, the resulting error was a layline call off 10 degrees, which is a lot. That resulted in a VMG error of 0.1 knot. That is about 7 seconds per mile which is a bit more than twice the smallest handicap step so significant but not overwhelmingly so if you don't have any other way. Butter to use the TURN indicator if you know your gybe angle. - What current should I use for a leg?
It depends on what you are trying to do. If you are looking at the next leg screen and trying to decide which sail to use, you might want to try several currents if there is a large variation across your course. If you are going to use the Waypoint screen's distance to the layline, you want to pick a current that represents the average current you will see in the most important branch of the leg, typically the last branch. - What do I do if I cannot ping both ends of the starting line?
Sail along an extension of the line and select the end you cannot get to, say the Pin. Go to C&D on the Pin page and click BOAT for the direction and an approximate distance for the distance, or 1km if you don't care. Save this mark. Then ping the CB as you normally would. Another way is to sail along the extension of the line and ping the pin, then when you get to the CB ping it normally. Then go to the move line page and move the pin to the left by 1km or whatever distance you want. - Can StartLine record the finish time for me?
Yes. Just enter both ends of the finish line as your final two marks. Put the one you want to go to first but you can always switch to the other with the NEXT button. When you cross the line between these two marks, the finish time will be recorded and displayed. - How can I record the finish time of my main competitor?
When they corss, press the "Mk" button on the waypoint screen. The time will be displayed in the waypoint field. Both the finish time of your boat and the Mk time are displayed on the Check screen. Press the "Check" button on the main menu. - How do I install StartLine if it is not in the Play store?
Enable "Unknown Sources" in the security section of your phone or tablet. Then go to the email I sent with the program. Install it. Run the program once. It will run for 15 minutes without the license. After you run it, move the license file from your Download directory to the StartLine directory using your File Manager. Rename the license "License", removing your name from the file name. The license will still have your name associates with it and if you change the name in the license file, it will not work. You can see the license details at the bottom of the Check screen. If you got a temporary license, you can see how many days it will run at the bottom of the main menu. - Q: How do you start at places other than Pin, Mid, or CB?
A: That is usually enough. You can ping your spots and then move them so if you want to be 30 meters from the pin, ping the pin and then move it 30 meters toward the SB. The other way is to target the Pin but aim to be 10 seconds late to the layline. That should put you about 30 meters from the pine when the time to burn hits 0. Obviously depends on boat speed. - Q: How do I set target speed?
A: This is the hardest part. The best way to do it is to do a practice run and use the auto cal. That will set it. On a reaching start, you can decide on the angle to the line so it is just speed that matters, which is a fair help. You can use the wind stats to enter a wind speed and direction and get a start from that but you will be off because of the reaching. You need to enter boat polars to do that but StartLine will do a reasonable job of creating boat polars based on the type of boat you have. There is a target button on the start screen. You can also hit it and set actuals to target so you can do a little jog toward the line with a couple of minutes to go, hit actuals to target, and return to the start screen. Or you can know the characteristics of your boat and just guess. If you sail in current, you can use the water reference function to set the target speed and the app will adjust for the current. - Q: Where do I live?
A: I live in Palo Alto and sail in San Francisco Bay. Thus the need for StartLine to deal with current.
Setting Target Speed and Heading
Buttons
Displays
Set Targets Manually
Displays
Buttons
Speed Buttons
Angle Buttons
What Are Target Angles and Laylines?
Target angles are the angle that your boat will make with the starting line when you cross. This will always be a number between 0 and 90 degrees where the 0 degrees is the same as the starting line and 90 degrees crosses the starting line at right angles. Laylines can start at either end of the line or the center. Time to the layline is the time for your boat at the speed it is going to get to the layline traveling parallel to the starting line.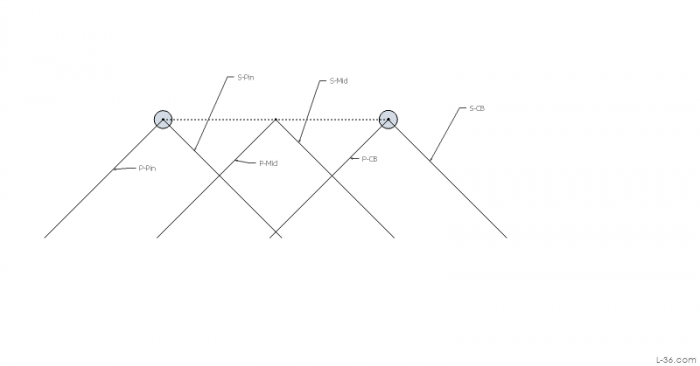
Start
Displays
Over early warning If your current VMG will put you over the line at the start, the display to the line will turn red. In the unlikely case StartLine calculates that you are late but your VMG would make you early, the display would be yellow.
Buttons
Sounds
There are different options for what sounds are said when. Option 0 is no sound. Option 2 is preferred.GPS Accuracy in starting.
A WAAS enabled GPS receiver should have an accuracy that can be represented by a standard deviation of 2 meters according to government data. That means you will be that accurate most of the time, about 2 out of 3 times. If trying to get back to a starting line, you could have that error on the starting line ping, and the same error, but opposite direction, on the boat position. Combining these, we would expect to be inside of 1.4 times the single error or 2.8 meters 2 out of 3 times. It might be reasonable to ask to be within some error 95% of the time, or 19 out of 20 times. That would imply we can expect an error of about 5.6 meters or about 20 feet. Worst case error might be taken as the 99% case, which would be 30 feet. That is a number I have observed in field testing, which is a good check. But using these percentages overstates the risk of being over early, which is what we are really interested in. Using the 20 feet number for 95% confidence, about half the time you would be early, but the other half you would be late. So instead of 1 time out of 20, it would be one time out of 40. And the 10 foot number you would not be early 5 times out of 6. This assumes there are no errors on the program, that the GPS has warmed up for 1/2 hour, and that nothing serious goes wrong with the hardware.
Note that the accuracy readout corresponds to the less than one standard deviation, or about 1.4 meters in the discussion above. So as a rough rule, if you are looking for 1 chance out of 40 you want to allow 4 times the indicated accuracy number.
One final word of caution. If you get a wind shift and your starting line marks are anchored, the line will move as the boat and pin swing on their anchor lines. If the line starts out true, at 90 degrees to the wind, then a wind shift will move it toward the course side.
Waypoints
Displays
Buttons
Sounds
There are several combinations of sounds that can be selected in the Parameters screen. Experiment to see which one you like. More can be added if desired.Select Route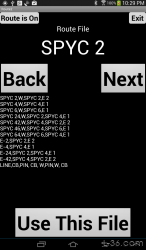 |
Tack Log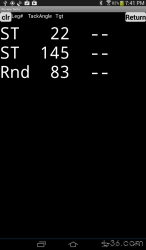 |
Speed+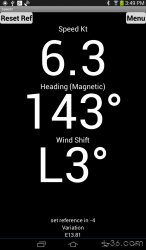 |
Wind Menu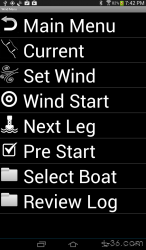 |
Current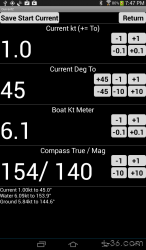 |
Wind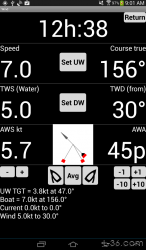 |
Wind Start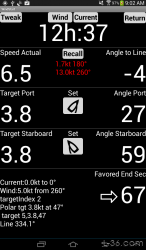 |
Wind Pre Start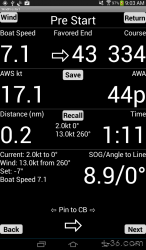 |
Wind Next Leg
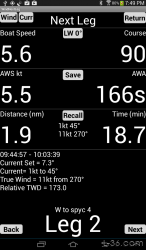
The lower readouts show the distance of the leg and the time it would take to get there if you sailed straight. Note that this may be long indeed if the leg is a beat as this calculation does not take tacking into account the way the waypoint readouts of time do.
The button that says LW 0 degrees is the leeward readout and enable/ disable button. If you press it, the leeward correction would be turned off. This leg is downwind so there is no leeward correction. You enter parameters to allow StartLine to estimate the leeward correction. If you don't know your boat, you might try 10 as the leeward constant and 25 degrees as the heel. The correction is small so this is not critical but it should help slightly. You can adjust your numbers if you make leeward calculations. Search the web for instructions. The constant is the same as the industry standard constant. The heel is your target heel for moderately high winds. The program will decrease the heal number if the wind gets light so this is not a number you have to change once it is set.
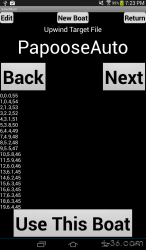
Wind Setup - Select Boat
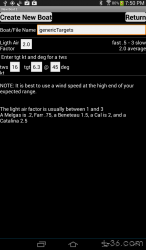
Entering and Editing Target Files
 |
 |
More 1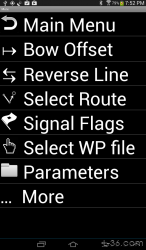 |
The more menu takes you to more pages :-). This page has the most used functions. | More 2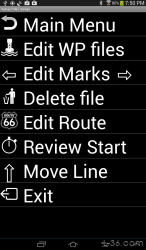 |
Most of the buttons on the two More menus take you to pages described below. |
Review Start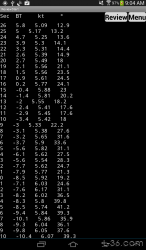 |
This page displays key parameters from the last start log. If you do multiple starts per day, this can be used to decide on targets for the next race. It can also be used at the bar to figure out what happened on the start. |
Signal Flags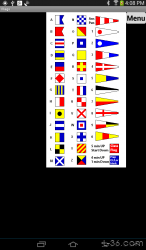 |
These are the signal flags plus the standard start sequence flags used in the 5 minute sequence. This screen shot was done on a tablet. On a phone they fill the screen. There is a button here called Review Pressing that will switch to the start activity and replay your last start. You mist have actually crossed the start line and recorded 10 seconds beyond in the log for this function to work. |
Bow Offset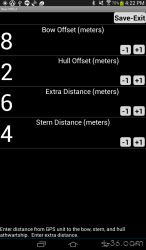 |
Select Waypoint Files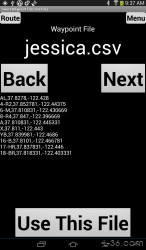 |
Edit Waypoint Files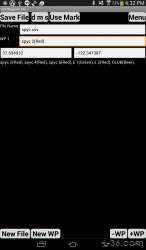 |
Edit Marks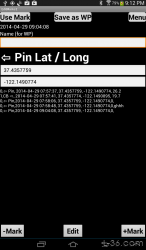 |
Move Line
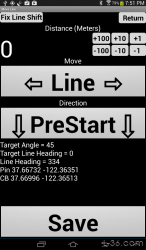
The fix line shift button, which is also on the Target Menu page, will allow you to adjust the targets if you move either the CB or Pin toward the course or pre start without moving the entire line. This assumes the wind as not moved. You might want to do this if you see the CB drag anchor and cannot re-ping. But you have to know how much it moved!
Delete Files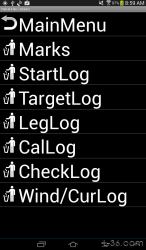 |
Edit Route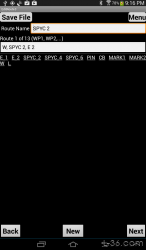 |
Parameters
Remote Control
StartLine will respond to a Bluetooth remote that has a volume up and volume down control. Volume-down button is a TAB and will advance the active button on the page. Volume-up button is ENTER and will press the button. The default now allows the phone's volume rocker button to control the device.To reprogram the codes, create a file called "Remote.txt" in the StartLine directory on your sdcard directory with your codes in the following order ENTER, ENTER, TAB, TAB, MENU. Note that there are two codes for ENTER and TAB so that you can program two keys to do the same thing. Make sure there is a comma separating the numbers. Keycodes are read back on the Parameters page as small "toasts".
Section 2 - Instructions on Using StartLine
How to use
Of course, the time to the start is the most important readout and at some point has to be the main readout of interest. The errors of the GPS mean that you could be 30 feet off of where the line says it is, something like 6 to 9 seconds. Remember that the GPS accuracy is a mean accuracy that you would get most of the time. The peak accuracy is not near that good, more like 15 feet. The difference between the line measurement and the position can be twice that if both errors go the wrong way. You can observe errors of this magnitude by taking a track and walking a course that takes you back over the exact same area. These errors probably only come up when satellite constellations change as short term the errors can be extremely small.The pings of the waypoints use two readings, one before and one after the time you press the button. They also assume you are on a constant heading and speed. All of this corrects for the delays in the GPS signals. You will find StarLine is much more accurate than a Garmin GPS in pinging the line when moving because of these corrections. The corrections were tested at 25 MPH but you can observe this effect while walking.
The time to burn readout indicates when you should stop fooling around and head right to the line. Basically when it reaches the target number of seconds, you are racing - head to the first mark. The target burn time may not be zero. It is the time it takes to turn and accelerate and can be measured by taking a practice run using the cal function of the main target screen. We have only used the cal function once and it indicated zero as the target burn time. We should take a practice run every race and get a library of target times for various approaches.
The theory on this is that if you do a practice run from a given distance from the line and time that run, then repeat exactly the same run during the start sequence, you will be right on time. If you do not start the actually run at the same distance as your practice run, you will take a little more or a little less time to get to the line. That difference will be traveled at the speed the boat is going when it crossed the line during the practice run or at least close enough to that speed. The burn time makes that calculation and adjusts for the actual distance to the line. This will allow you to start closer or further from the line and still have a calibrated readout to use to gage the start.
The equation for time Burn time is:
BurnTime = TimeToStart - TimeToLine
Where:
TimeToLine = DistanceToLine / VectorTarget SpeedToLine
Therefore:
TimeToLine = TimeToStart - BurnTime
Laylines
The last display deals with the laylines. No layline information is in any of the above displays.The layline display shows the time to the layline assuming you are traveling at the greater of your target or actual speed and traveling parallel to the start line.
If the goal was to get right to the layline at the target time to burn, you would need to look at both the time to the layline and the time to burn. In the simplest case, if the time to burn target is 0 and you wanted to get right to the layline, you would want the time to the layline to equal the time to burn. That way when you get to the layline the time to burn would be zero.
But in reality it might be more complex than that. You might have a target burn time (time to turn and accelerate) of, say, 5 seconds. In this case, you want the time to the layline to be 5 seconds less than the burn time so that when you get to the layline you would still have 5 seconds to go. On the other hand, you might want to be two boat lengths (6 seconds) short of the layline to allow for a turning radius and a little margin. That would mean you would want the time to the layline to be more than the burn time so that you cold not get to the layline with the time remaining. Of course, both these factors might apply and in this example you would want the time to the layline to be 1 second more than the time to burn.
The other possibility is that you might not be headed to the layline. You might be doing a turn or heading away from the layline. Turning back is going to take some time and you need to add that into your calculations. If it takes a minute to turn the boat 180 degrees and get back to speed, then you want the burn time to be larger than the time to the layline by a minute.
The default readout is burn time to the layline. The readout is in seconds and there is an arrow to show you the direction of the layline relative to the boat on the start side looking at the line. Left arrow means the layline would be to the left if you were looking at the line. A negative number means you are not going to make it to the layline before it is time to start toward the line. The course is always assumed to be parallel to the start line so you can make up time by sailing an angle more toward the line, or use up time by sailing away from the line. If you are late (negative burn time) the display turns green for GO. The readout is in seconds.
The other possibility is Time to the Layline.
Vanderlee Start
With the Vanderlee start you sail parallel to the starting line but away from your target layline. You watch the burn time to the layline and when it hits your target value, say 14 seconds, you turn and head to the layline. If you allowance of 15 seconds was correct, you will now see your target time to turn as your burn time to the layline. When you hit your layline, your burn time to the line will read this target time to burn and you head to the line for a perfectly timed start.Here is an example. If you know it will burn 10 seconds to turn the boat around but your time to turn for the line is 4 seconds here is what you would do. Sail away form the layline and when your time to burn to the layline is 14 seconds you turn. After completing your turn, your burn time to the layline is reading 4 seconds. As the boat accelerates, it remains 4 seconds because you entered your time to accelerate in the parameters menu to compensate. Your speed is higher than your target start speed but you entered the prestart ratio of 1.25 so everything is calibrated. You are sailing in 1 knot of current so your speed was lower going away from the layline than sailing back but you entered the current correctly so everything stays calibrated. When you get to the layline, you see 4 seconds to burn to the line and you start your turn. After your turn, you have slowed the boat and your burn time to the line reads zero, you will be right on time. Be sure to watch that you are not early as there is some error inherent in GPS readings.
Section 3 - FAQ
NOTICE: Some pages have affiliate links to Amazon. As an Amazon Associate, I earn from qualifying purchases. Please read website Cookie, Privacy, and Disclamers by clicking HERE. To contact me click HERE. For my YouTube page click HERE