Line and Rigging
Jib Trim Off the Wind
The case for using a Twing
By Allen Edwards
Twing - Similar to a Barber hauler, a twing adjusts the angle of sheeting.
Most serious racing is either hard on the wind, or downwind. But many of us sail and race off the wind on a reach. My Tuesday evening races often have a reaching leg in a triangle course for example. This article deals with how to adjust sail trim for off the wind specifically dealing with vertical jib sheet angle. I will assume that you know how to adjust your jib fairlead for correct trim on a beat and there are many articles that deal with this. Two excellent ones are Quantum Headsail Trim and This one. But what should you do when sailing off the wind other than let the jib sheet out? That is what this article is all about.
Update
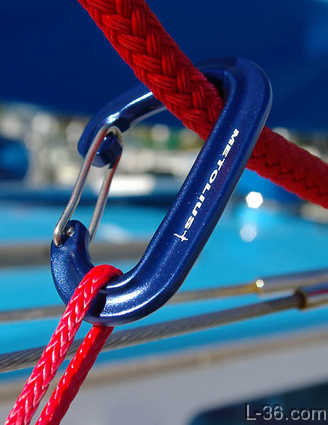
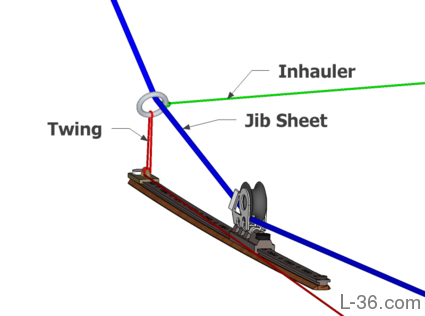 This is the setup I am now using on my blade jib. I no longer use a carabiner as I like both the twing and inhauler hooked up and ready to use all the time. The round cross section ring has less friction and having both control lines on the same ring helps keep the ring from flopping around on the deck. In the case of the larger jib that does not have an inhauler, I use a locking carabiner that has a round cross section. The locking part is important as the spring gates can lock themselves to the lifeline and that is a mess.
Questions have been raised about the friction on the red control line running through the track car and ring. There is some friction loss but using Amsteel reduces the friction considerably. Tests show that this setup has a slight mechanical advantage, about 1.1:1 so while not the theoretical 2:1 you would have if no friction, it is better than having a bearing block at the track and a line spliced to the ring.
Original Article
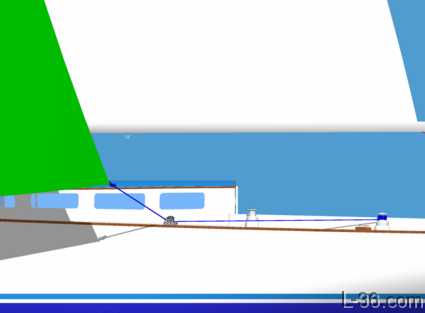
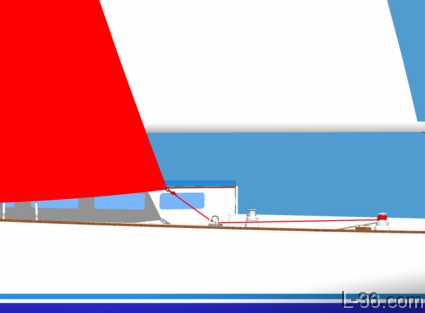 The picture to the left is my boat with a well trimmed 155 Genoa trimmed for hard on the wind. Everything looks good and we are trimmed just like it says in the article. Actually, this is just a sketch but let's pretend.
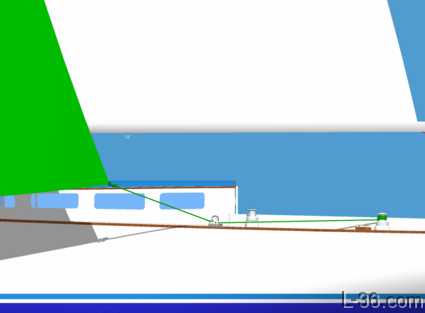 Here the same sail, this time in green, is positioned correctly for sailing off the wind. We have let the jib sheet out and the sail has gone out and forward.
But something is wrong with this sketch. This cannot happen in the real world. The angle that the jib sheet is making with the clew means that most of the force is along the foot and not enough is pulling the sail leach down. The sail will not stay in this position. The clew will go up and the sail will twist off at the top spilling much of the wind.
 Perhaps the jib would end up flying like this but the main issue would be at the top where the added height would be equivalent to letting the top half of the sail out way more than the bottom half. You could have the top half luff while the bottom half was over trimmed. Not a way to go fast. I should mention that you might want to sail like this if you are overpowered and want to spill wind off the top, but that is another topic. Assuming you are not over powered and want to get good trim, your goal is to have the sail such that the sail luffs evenly from top to bottom. With the setup shown on the left, the sail is going to luff at the top first, then the middle, and lastly the foot. Not good.
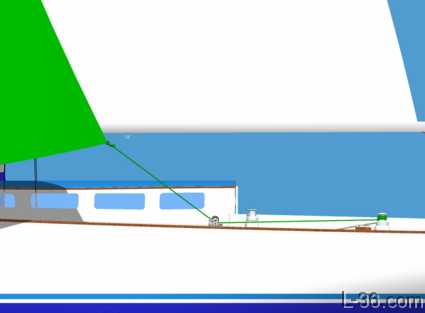
 As we all know, what you need to do is move the jib car forward as show here. By moving the jib car forward, we have corrected the problem. The force from the jib sheet is now nicely split between the foot and the leach so the sail will actually be able to stay where it is shown in the sketch. This is the way I ran my boat for a season, using a winch to pull the car forward. The problem is that it is very difficult to move the car forward under load. Not only that, but to get the car to move back, you have to go kick it back. It really wasn't satisfactory and I went looking for a better way to accomplish the goal of getting the correct vertical jib sheet angle. That is when I discovered what I called a jib sheet downhaul but now call a twing.
 It is so much easier to leave the jib car in one position and add a twing to get the correct vertical angle. Taking a line from a pad-eye or rail car, up through a carabiner, back down through the pad-eye and back to a winch or other mechanical advantage like a block pair really makes it easy. I am using 1/8 inch Amsteel which is more than strong enough for the job and has the advantage of being slippery for the turn through the pad-eye and carabiner. You do not have to use a carabiner. Some people use a snatch-block (too heavy knocking around on the deck) or a simple ring (needs to be rigged ahead of time and is always on the sheet). I like the carabiner because most of the time we don't need the twing and a carabiner can be attached only when needed. I like the small REI carabiners. Turns out that virtually all climbing gear is rated at 5000 pounds so that a climber can fall and have the equipment survive the shock load so that he also survives. These carabiners are light, strong, and cheap. Small is good if you want to bring the sheet very close to the pad-eye.
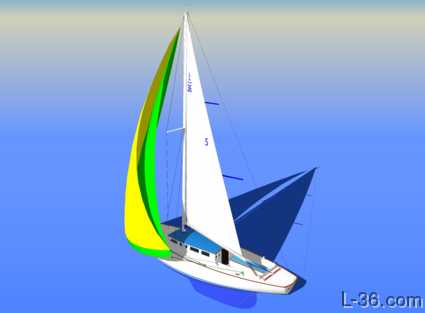 This sketch shows both the properly trimmed green jib and the twisted yellow jib. Both use the same jib car position on the track but the green jib has the advantage of the twing to bring the clew down. You can clearly see that the yellow jib is twisted off on the top compared to the green jib. Some people asked why I bothered to creates these sketches but other than the problem of having to have another boat to take the pictures, try getting this picture in real life.
An interesting point about jib trim. We can all imagine trim for the perfect foil, highest lift. That is a shape with no luffing and both leeward and windward tell tails flowing nicely back from the luff. If we let the sail out more or take it in more, we decrease lift, which is our driving force. If that were the only force involved, that would be the best way to trim the sail. But there is also drag. The more the sail is trimmed tight, the more drag and the more the sail is let out to fly free the less drag. You want more lift and less drag. It turns out that if plot lift and subtract drag, that moves the point of best trim slightly toward having the sail luff a bit. In other words, the perfect trim has a very slight bubble in the luff. That, among other things, has led to the saying "when in doubt, let it out". The take-away is that it is really bad to trim in too tight and not as bad to let the sail out so you can see that it is on the edge of luffing. Of course, on a reach, it is up to the jib trimmer to constantly adjust the sail as the boat is sailing to a course.
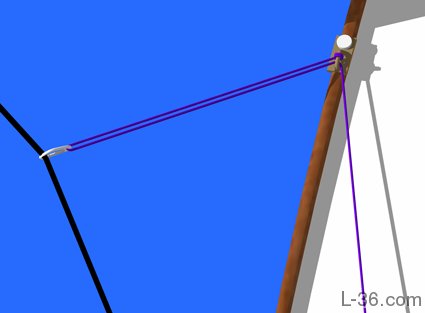
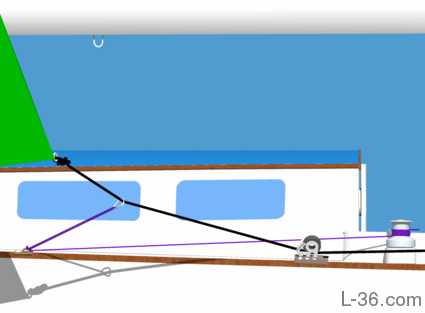 Here is a closer view of the twing in action.
The glossary definition given at the top of the page says:Twing - Similar to a Barber hauler, a twing adjusts the angle of sheeting. The difference between a twing and a Barber hauler (also barberhauler) is that a Barber hauler adjusts the jib sheet angle athwartships where a twing adjusts the vertical angle of the jib sheet. Actually, a Barber hauler is named after Jim Barber who was the first to use it to pull his jib sheet out. It has also been called an outhauler. Another control, more popular now than an outhauler pulls the jib sheet in toward the center of the boat. Big time racing boats like TP-52's use these. I like to call them inhaulers but people use the term Barber haulers to describe them as well. Said another way, a Barber hauler is equivalent to changing the location of your jib track closer or further from the centerline of the boat. A twing is equivalent to sliding the jib car along the track (but a lot easier to do).
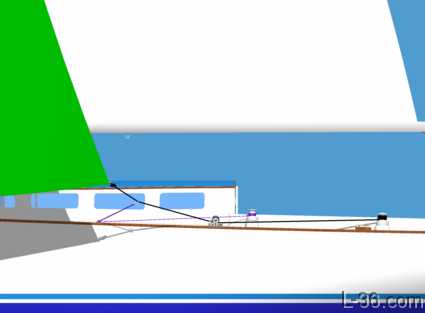
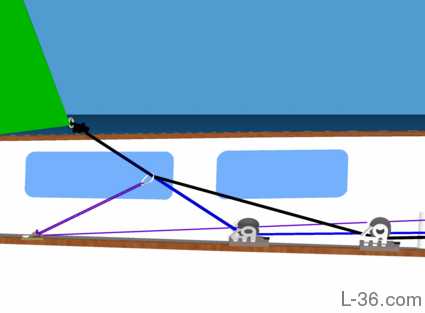 The sketch to the left shows both the view with the jib car moved forward on the blue sheet as well as the twing on the black sheet. You can see that as far as the jib is concerned, there is no difference. As far as your crew is concerned, there is a huge difference.
 This is a closer view where you can see more clearly how the lines are set up. Obviously there are variations that might work better for your boat. This setup gives a 2:1 mechanical advantage because the pad-eye and the loop through the carabiner. When I first used a twing, I tied it off to the carabiner and just ran it through the pad-eye. This does not have the 2:1 advantage so you have to pull twice as hard on the control line, but it also works. I like using Amsteel and putting an eye in the end and looping it through the pad-eye to attach it. You obviously do not want to tie a knot with Amsteel as it will slip. I have also used 1/4 inch Samson LS for the twing. The disadvantage of that is that the knot is large and restricts the ability to get the carabiner right down to the pad-eye. The point is that there are many variations that you can experiment with.
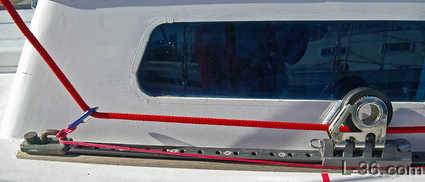 I also use a twing on my 90% blade jib. The geometry of the jib sheet is such that the lower cut the sail, the quicker the jib sheet angel gets too low as the sail is let out. With a blade, that happens very quickly and the twing is used as soon as the sail is out at all. This picture shows the twing in maximum position. If I installed a pad-eye forward of the track, which I intend to do, I would get even more range. It would also prevent the electrolysis I am getting on my aluminum track from the bronze and stainless steel cars.
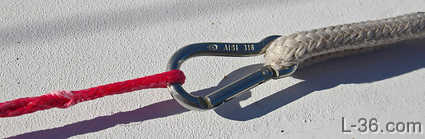
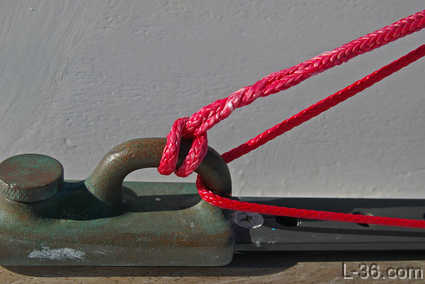 To the left is a close up of the actual twing on Papoose. The eye splice is a brummell splice and the easy way to make them is a McDonald brummell.
 I used to use these small carabiners for the twing but found out that they can clip themselves to the most inconscient places and things. I switched to either locking carabiners or solid rings.
 With a carabiner you do not have to have the twing rigged all the time. Here it is hung ready to go but out of the way. Again, use a locking carabiner or you might fine the sheet locked to the lifeline. Don't ask how I know that.
A little discussion on the name twing. I started using one thinking I was the only one on earth who used such a set up. I have since fond others who also thought they were the only ones using it. Nobody seemed to know what to call it. Most called it what I did, a jib sheet downhaul. But downhaul means something else so that is incorrect, plus it is not a name so much as a description. The term twing is often applied to a line that pulls down on a spinnaker sheet. The definition that starts this article appears in a few online glossaries of sailing terms. As it doesn't differentiate between spinnaker and jib, I decided to go with it. Other names I considered, besides jib sheet downhaul were: downhauler, choker, and lizard.
 If you were really paying attention you would have noticed that the line I stored in the picture just above was not long enough to reach the winch. I use a regular yacht braid for the part of the twing that goes on the winch. That is easier on the hands and is quick enough to clip onto the twing as it is attached to the sheet. You get more grip on the winch this way as well. UPDATE: I use my soft line shackle instead of the carabiner shown. This allows the line to go around the winch without causing problems.
That is the story of Papoose and the twing. I hope you have enjoyed this article and find using a twing an exciting addition to your boats rigging.
NOTICE: Some pages have affiliate links to Amazon. As an Amazon Associate, I earn from qualifying purchases. Please read website Cookie, Privacy, and Disclamers by clicking HERE. To contact me click HERE. For my YouTube page click HERE