Racing
Using a Whisker Pole
Racing with a whisker pole
By Allen Edwards
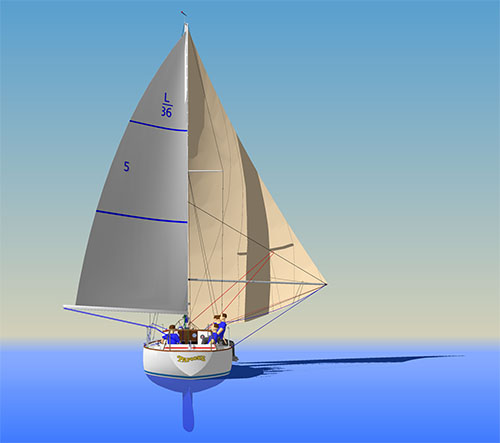
We learned many things about using whisker poles over the last ten years racing one design non spinnaker. The first thing we learned is to get a bigger whisker pole. Papoose is 36 feet with a #1 jib of about 400 square feet and a J of 13.5 feet. The first pole was long enough but not strong enough and ended up bent in a complete C shape where both ends were pointed in the same direction just before one of the end fittings broke off. We felt lucky that the person on the foredeck at the time was not killed. Our next pole was a Forespar 12-22 line control pole with a 3 inch outer tube and a 2.5 inch inner tube. This is the smallest pole I would consider for this boat and it is possible the next larger pole would have been a better choice.
The next thing we learned is that you can cut a slot into the pole in a single race if you let it rub against the rigging wire if you pull the sail back far enough. A foreguy that goes from the outer end of the pole to a fitting on deck helps prevent this. Forespar says you do not need a foreguy and can use the lazy sheet as a foreguy and while that works, I would not recommend it.
That cut happened on the first race where we used the pole, which we won. Our pole is what they call a line control pole because you can extend it with a control line.
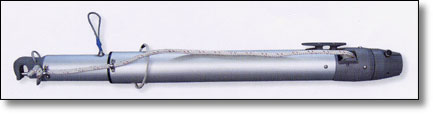
The nice thing about a line control pole is that you can put it on the mast before extending it. What they don't tell you is that you cannot extend it on a sheet that is under load. You can only extend it on a lazy sheet. By the way, a whisker pole should be clipped to the sheet and not to the clew ring. Put the pole out first, then gybe the sail over to the pole. If you really need to put the pole on a loaded sheet, extend the pole first, take it off the mast, and attach it to the sheet with the jib behind the main. This might take two people. It is also potentially dangerous and while we have done it, we are no longer using that technique. Whatever you do, if you find yourself looking down the pole from one of the end fittings, you are doing it wrong. Of course, if you do not have a line control pole, you must extend it first and then put it out either to the sail behind the main, or on the lazy sheet. To put a pole on a loaded sheet, stand between the mast and the sail and pull the pole to the mast fitting. Whatever you do, do not try and put a pole on a jib that is not behind the main.
The next thing we "learned" was that if you let the pole hit the water, it will be forced into the rigging and will bend one of the tubes. You will then have to replace that section which in my case was about $300 and a day's work. A little cleaver arrangement of your topping lift can help make that occurrence much less likely and make handling the pole much easier. You won't find this idea anywhere else so listen up. The topping lift goes from the outer end fitting on the pole to about half way up your mast then back down usually fed aft to the cockpit area where it is cleated. The problem with line control poles is that when they are short, the setting for the topping lift that was correct when the pole was long is no longer correct. That means you need to adjust the topping lift depending on the length of the pole. Adjusting the topping lift with the pole out over the water means that if you mess it up, the pole goes in the water and bends. The trick we came up with is to have a bridal on the topping lift, but not a conventional bridal with legs going to the inboard and outboard ends of the pole. One leg of the bridal goes to the end fitting of the pole. Set the topping lift for the correct height with the pole fully extended. That second leg of the bridal goes to the wire loop on the end of the larger pole section which will be mid pole when the pole is extended but near the end when the pole is short. Adjust the bridal so that the pole is held off the deck and clears the pulpit without changing the setting of the topping lift. Now, regardless if the pole is long or short, one of the bridal legs is under tension and the pole can never hit the water. We have the lengths set so that we lift the pole to a height that clears the pulpit and the forestay with the pole at the correct height on the mast. The pole will be slanting down so the tip will be below normal working height. The outer topping lift section is the correct length so that the pole is level when extended without adjusting the topping lift. This way you can set and cleat the topping lift with the pole over the deck and not touch it except perhaps to make slight adjustments.
I mentioned the foreguy. It is very important to have the foreguy sung. This prevents the pole from "skying". Let me explain how that happens. First a bit on terminology. Lines that attach to a pole are guys. The sheet of the sail will become a guy once the pole is clipped to it. If you are sailing off of dead down wind you want to have the sail more foreword. If you ease the guy to let the pole go forward and do not keep the foreguy snug in the process, at some point the pole can sky. That means the sail lifts the pole. It is possible at this point for the pole to hit the forestay and bend. This is because the distance from the guy fairlead to the pole when the pole is forward and level is longer than the shortest perpendicular distance from said fairlead to the forestay. At that point you have another $300 full day repair. So bring the foreguy in as you ease the pole forward and don't count on using the lazy sheet as a foreguy.
We have covered getting the pole on the jib lazy sheet making it a guy and gybing the jib over to the pole. We talked about easing the sail forward to sail a bit off of DDW. Now it is time to take the pole off of the guy. How do you do that? If you read the Forespar instructions for using a whisker pole they tell you to use it jaw down. The reason that they say that is that if you furl up your jib, you can release the piston and the guy will fall out of the jaw. But if you want to remove the pole from a flying jib, you cannot do that with the jaw down. Virtually no matter how high you raise the pole, the sail will just go up with it and the guy will not release. You must use the pole with the jaw up. Forespar technical support will tell you that even though their written documentation will not. Part of the reason is that they sell stuff to allow you to store the pole up on the mast and that stuff only works with the pole jaw down.
If you have a fixed pole, you need to ease the guy, take the pole off the mast, and release the piston. With a fixed pole, a conventional bridal would be the way to go. You will need to lower the pole some to pull it out of the guy. With a line control pole, and the double bridal explained above, you can shorten the pole and the inner bridal will automatically lower the pole so that you can release the piston and the guy will pop out of the jaw due to the force of the sail lifting up. All this can be done without touching the topping lift. You do need a longer trip line to do this as the one that comes on the pole is very short. If you do make a longer trip line, you will want to secure it to the pole extension control line. Make it long enough so it doesn't open the jaw when the pole extension line is tight. If you secure the trip line to the pole itself, it will be too long when the pole is short and you will have a big loop that might try and strangle your crew.
To gybe, shorten the pole, release the guy, and swing the pole over the pulpit onto the leeward side. You will recall that the shorter topping lift bridal line on the inner pole section is set so that the topping lift is at the correct height for this maneuver without having to adjust anything. Then put the pole on the leeward sheet. All this time have a crew member hold the jib out to weather by hand, something we call being a human pole. Extend the pole again and then let the jib go over to the pole. Pull back on the new guy and then gybe the main.
I hope you find these techniques useful. No matter what kind of pole you are using there are some basic rules to keep in mind. Do not try and put a pole on a jib that is out to weather. Do not try and extend a line control pole after it is holding the sail out. Don't let the pole hit the water. And finally, keep the pole under control with topping lift, foreguy, and guy all tight to hold the pole firmly in place.
NOTICE: Some pages have affiliate links to Amazon. As an Amazon Associate, I earn from qualifying purchases. Please read website Cookie, Privacy, and Disclamers by clicking HERE. To contact me click HERE. For my YouTube page click HERE