Knots, Splices and Rope Work, by A. Hyatt Verrill
Chapter 6 - Lashings, Seizings, Splices, Etc.
CONTENTS
- Cover
- Introduction
- Chapter 1 - Cordage
- Chapter 2 - Simple Knots And Bends
- Chapter 3 - Ties And Hitches
- Chapter 4 - Nooses, Loops, And Mooring Knots
- Chapter 5 - Shortenings, Grommets, And Selvagees
- Chapter 6 - Lashings, Seizings, Splices, Etc.
- Chapter 7 - Fancy Knots And Rope Work
LASHINGS, SEIZINGS, SPLICES, ETC.
Almost any one can lash a rope more or less satisfactorily, but a knowledge of how to do this properly and in the manner best suited to each case is of great importance to seamen and others having occasion to handle ropes, rigging, or in fact any cordage.
The varieties of lashings, seizings, whippings, and servings are almost innumerable, but a few of the best and most frequently used are the "Wedding Knot" or "Rose Lashing," the "Deadeye Lashing," the "Belaying-pin Splice," the "Necklace Tie," the "Close Band," and "End Pointings."
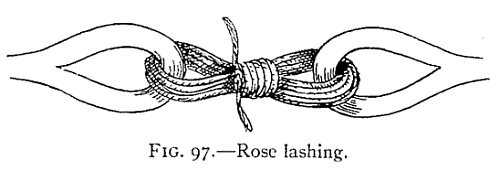
The rose lashing (Fig. 97) is used to join two eyes or ropes finished with loops.
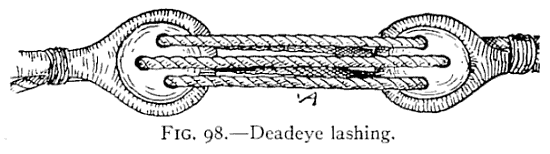
The deadeye lashing (Fig. 98) is frequently used on ships' standing rigging and is a familiar sight to every one who has seen a sailing-vessel. It consists of a small line reeved back and forth through the holes in the "deadeyes," A; the ends are then seized to the standing rigging to prevent slipping. This lashing admits of easy and rapid lengthening or shortening of the rigging and is particularly useful in connection with wire cable.
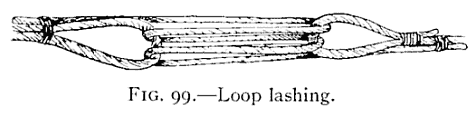
A similar method may be used with loops instead of deadeyes (Fig. 99).
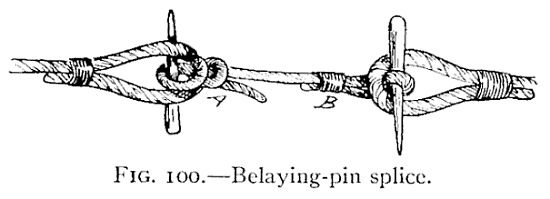
The belaying-pin splice, shown in Fig. 100, is a quick and handy way of fastening two ropes together and is of great value when rigging is carried away and some quick method of joining the severed ends is required. Pass a belaying-pin or similar toggle through an eye or loop in one end of a rope and pass this through a loop or eye in the broken rope end. Form a loop in the other broken end, slip the free end of the lanyard through this and around another toggle or pin and haul taut; then fasten by half-hitches around standing part (A, Fig. 100), or by seizing (B, Fig. 100). This is a strong, reliable fastening and can be tightened up or instantly thrown off at will.
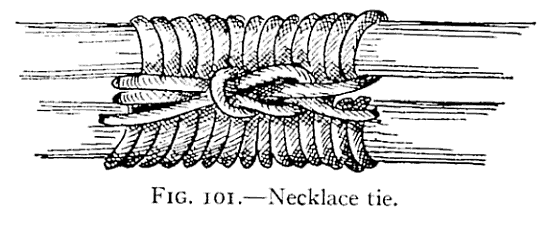
The necklace tie is useful in holding two ropes, hawsers, or timbers side by side (Fig. 101). The lashing is passed around and around the two objects to be joined and the ends secured by a square knot passed around the band lengthwise.
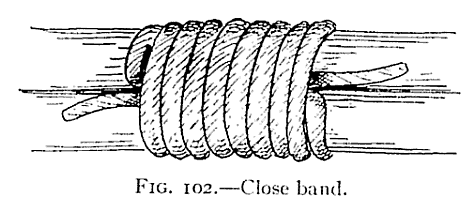
The close band is used for the same purposes as the last and is made in the same manner, but the ends are fastened by drawing through beneath the turns (Fig. 102).
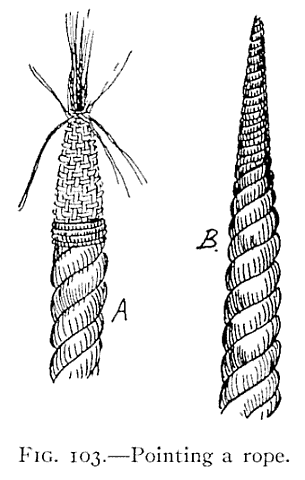
End pointings are very useful as well as ornamental, for while an ordinary seizing or whipping will prevent the strands from unravelling, the ends are broad and clumsy and oftentimes are too large to pass through a block or eye large enough for the rest of the rope. The ordinary way of pointing a rope is to first whip as described (Fig. 4), and then unlay the end as for the Flemish eye. Take out about two-thirds of the yarns and twist each in two. Take two parts of different yarns and twist together with finger and thumb, keeping the lay on the yarn and thus forming left-handed stuff known as "nettles." Comb out the rest of the yarn with a knife, leaving a few to lay back upon the rope. Now pass three turns of twine like a timber-hitch tightly around the part where the nettles separate and fasten the twine, and while passing this "warp" lay the nettles backward and forward with each turn. The ends are now whipped with twine or yarn and finally "snaked," which is done by taking the end under and over the outer turns of the seizing alternately. If the rope is small a stick is often put in the upper part to strengthen it or the tip maybe finished with a small eye. If properly done a pointed rope is very handsome and appears as in B, Fig. 103.
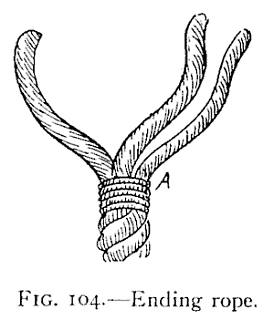

Another simple way of finishing a rope end is to seize the end, as at A, Fig. 104, and open out the strands, bring the strands back alongside the rope, and whip the whole (Fig. 105).
Splicing is, in many cases, more useful and better than tying or bending ropes together and a good splice always looks neater and more ship-shape than a knot, no matter how well-made it may be. A person familiar with splicing will turn in a splice almost as quickly as the ordinary man can tie a secure knot, and in many cases, where the rope must pass through sheaves or blocks, a splice is absolutely necessary to fasten two ropes or two parts of a parted rope together.
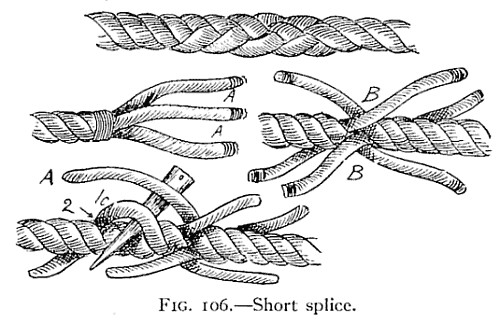
The simplest of all splices is known as the "Short Splice" (Fig. 106). This is made as follows: Untwist the ends of the rope for a few inches and seize with twine to prevent further unwinding, as shown at A, A; also seize the end of each strand to prevent unravelling and grease or wax the strands until smooth and even. Now place the two ends of the ropes together as shown at B, B. Then with a marline-spike, or a pointed stick, work open the strand 1c, and through this pass the strand A of the other rope; then open strand 2 and pass the next strand of the other rope through it and then the same way with the third strand. Next open up the strands of the other rope, below the seizing, and pass the strands of the first rope through as before, 3 A, B.
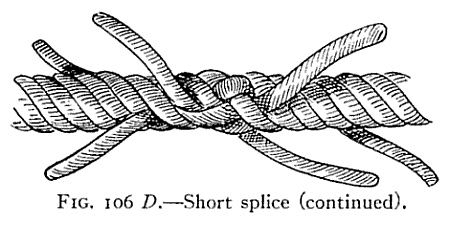
The ropes will now appear as in Fig. 106, D. Now untwist the six strands and cut away about half the yarns from each and seize the ends as before; pass these reduced strands through under the whole strands of the rope—the strands of the left under the strands of the right rope and vice versa—for two or three lays and then cut off projecting ends, after drawing all as tight as you can. If an extra-neat splice is desired the strands should be gradually tapered as you proceed, and in this way a splice but little larger than the original diameter of the rope will result. The only difficulty you will find in making this splice is in getting the strands to come together in such a way that two strands will not run under the same strand of the opposite rope. To avoid this, bear in mind that the first strand must be passed over the strand which is first next to it and through under the second and out between the second and third. In the following operations the strands are passed over the third and under the fourth; but the figures will make this perfectly clear.
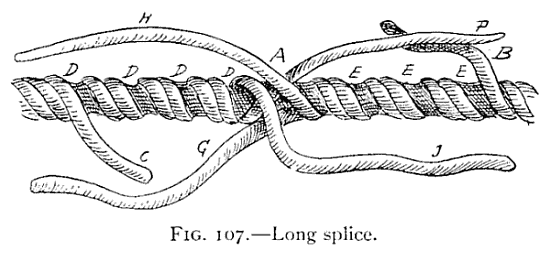
A far better and stronger splice is the "Long Splice," which will run through any block or tackle which will admit the rope itself; indeed, a well-made long splice cannot be distinguished from the rope itself after a few days' use (Fig. 107). To make this useful splice, unlay the ends of the rope about four times as much as for the short splice, or from four to five feet, unlay one strand in each rope for half as much again; place the middle strands together as at A, then the additional strands will appear as at B and C, and the spiral groove, left where they were unlaid, will appear as at D and E. Take off the two central strands, F and G, and lay them into the grooves, D, E, until they meet B and C, and be sure and keep them tightly twisted while so doing. Then take strands H and J, cut out half the yarns in each, make an overhand knot in them and tuck the ends under the next lays as in a short splice. Do the same with strands B, C and F, G; dividing, knotting, and sticking the divided strands in the same way. Finally stretch the rope tight, pull and pound and roll the splice until smooth and round, and trim off all loose ends close to the rope.
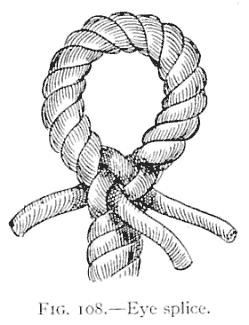
An "Eye Splice" (Fig. 108) is very easy to make and is useful and handy in a great variety of ways. It is made in the same manner as the short splice, but instead of splicing the two ends together, the end of the rope is unlaid and then bent around and spliced into its own strands of the standing part, as shown in the illustration.
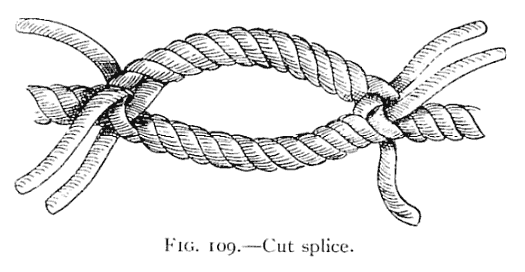
A "Cut Splice" (Fig. 109) is made just as an eye splice or short splice, but instead of splicing two ropes together end to end, or splicing an end into a standing part, the ends are lapped and each is spliced into the standing part of the other, thus forming a loop or eye in the centre of a rope. Once the short and long splices are mastered, all other splices, as well as many useful variations, will come easy. Oftentimes, for example, one strand of a rope may become worn, frayed, or broken, while the remaining strands are perfectly sound. In such cases the weak strand may be unlaid and cut off and then a new strand of the same length is laid up in the groove left by the old strand exactly as in a long splice; the ends are then tapered, stuck under the lay, as in a short splice, and the repair is complete; and if well done will never show and will be as strong as the original rope.
NOTICE: Some pages have affiliate links to Amazon. As an Amazon Associate, I earn from qualifying purchases. Please read website Cookie, Privacy, and Disclamers by clicking HERE. To contact me click HERE. For my YouTube page click HERE