Mast Climbing
Unassisted Mast Climbing
The Final Update
By Allen Edwards
Background
Some time ago I published THIS article on mast climbing. I reviewed 5 methods including two rock climbing techniques I modified for mast climbing. Of those there were two that I have tried extensively. One used a GriGri and it had real problems. I published an update on that HERE that solved the worst of those problems but still left some. Since then, I have tried both and conclusively settled on the one I called the Modified Technique. It is shown in the video below, which is approaching 30,000 views on YouTube. This update explains why the origonal system and how to use it and make it. Lately I use my Ultimate Unassisted Mast Climbing method. If I still had a mast that I had to paint, I would use the system described in this article as it allows going back up a bit to hit that spot I missed.GriGri System - Not Recommended
While the GriGri system has the advantage that you can get down effortlessly, it has several disadvantages. The main disadvantage is that you have to re-rig everything before you go down. This is frightening and time consuming. Plus, so often you go down and decide you need to go back up a bit to check something or touch up a paint spot you missed. On a recent job, I needed to alternate being above then below my spreaders to get at what I was doing. This wold have been a huge problem with the GriGri system. Descending can be frightening but that was greatly improved with the modifications I made in the follow up article. The final problem, and one that made the system just unacceptable for me is that when you are at the top and stand on the foot loops it unloads the GriGri and it can and does initially free fall when you sit back down. That combined with the other problems just made the modified approach my system of choice.Modified System - Recommended
I have tried some variations on this system since the first article and I think it would be useful to start from scratch and explain it again. I will try and explain the logic behind the selection of each part as I do this.The Setup
NOTE: The following links are affiliate links. I earn a small commission if you follow the links and purchase products. It helps keep me posting so please use the links.The setup of the modified approach is fairly simple. The boson's chair is attached using a carabineer to an Rescucender. The foot loops are made of climbing grade tubular webbing and are attached below the rescucender to the lower basic Petzl ascender. The attachment is with a second carabiner and it is hooked through the top hole in the https://amzn.to/3TLJVPpr. The reason for using the top hole, besides locking the line securely in place, is that releasing the tension on the ascender to lower it down the line can tend to hang up on the spikes of the cam. Having the carabineer body there helps keep the line away from the spikes. I like using the basic ascender because once you get up a little bit, the weight of the line is enough so you can just lift the ascender and it will come up the line easily.
How to Use the Setup
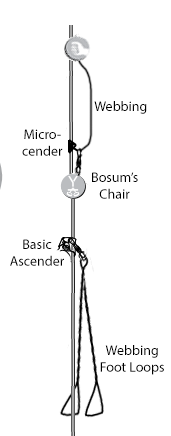 Let me explain the basic operation. Sitting in the bosun's chair you grab the line above you as high as you can with both hands. Then you stand up against the foot straps and pull yourself up at the same time using the line. Once you are standing, reach down and pull the rescucender up to raise the chair. I no longer use the extra loop from the initial article shown in the sketch but rather treat it in this two step manner. Use both hands grabbing onto the line to stand, then raise the chair as a distinct second step. In going down, you again stand up with the lower ascender a foot or so below the top one. Put one hand on the rope and the other on the ascender. Then give a little tug up on the rescucender to release it and slide it down to near the lower ascender, an inch or so above it. If you let it touch the lower ascender, you will have to raise it up a bit before releasing the lower ascender but no big deal. After you sit down, lower the bottom ascender and repeat the process until you are at the bottom. There is an additional reason for using a basic ascender on the foot loops. The rescucender is just not as secure because it does not have teeth. With the basic ascender below it, you have a back stop that does have teeth that will positively stop the rescucender should it not hold for some reason.
Ascenders
You will need two ascenders. The Basic ascender will be used on the foot loops. It is very easy to get to slide up and provides a positive stop should the rescucender slip. Going down is a little more difficult but as you are sitting down when you have to work it, there really is no problem once you get used to it. With the carabiner hooked as recommended, it works well. The second ascender you need is a rescucender. It is very easy to both raise and lower. Not quite as easy to raise, but as you will be standing on the lower foot loops which locks the line when you raise it there is just no way it will be a problem. NOTE: I used a modified microcender which is no longer made. Get a rescue ascender instead.Foot Loops
Use climbing strength tubular webbing. It is rated at 4000 pounds and you just know it is high quality. Every person is different and every chair is different as well. You will need to work out the lengths of the foot loops to fit your situation. In general, you want the length to be far enough away from the top ascender to give yourself some working room yet still in front of you up high so you can easily work them as you go up and down. I tried a setup with very short foot loops and, while I was able to cut one minute off the ascent time by using some shock cord to pull the lower ascender along, getting down was terrible and took almost twice as long. It is much better to keep everything up where you can get at it. You can sew the foot loops if you have a sewing machine that can take V-69 thread and a #16 or #18 needle. Or you can use figure-of-eight knots to tie loops in the webbing until you find lengths that work. Tie one small loop half way along your webbing for the carabiner and then tie the foot loops on the ends. Adjust the foot loops until you are comfortable and then either leave it or sew it.The Connections and Line
Don't use marine type shackles to connect everything together. They can unscrew and end your life. Climbing carabiners are designed to hold up a human, have safety locks, and are made for this task. I am using locking carabiners. Use locking carabiners, not spring gates. Non locking carabiners will get caught on things that you don't want them caught on. Don't ask me how I know. I like the one pictured on the right. The round cross section is helpful in a smooth descent. Besides, I use them on my jib twings.For line I recommend 11mm climbing rope. It was under $1 a foot and I bought 50 feet to go up my mast. It is stiffer than yacht braid and seems to work somewhat better than yacht braid. The ascenders slide up more easily. I recommend a dedicated line for ascending. For the safety line, anything will do as if I am hanging from it, I am not going to worry so much about how the ascenders work. I am going to worry more about how I am going to get down.
Attaching To The Safety Line
The idea of the safety line is to have an attachment that will keep you with the living should you get a catastrophic failure on the main setup, such as falling out of the bosun's chair. The ideal solution is something that just rides up and down the safety line and locks up if you fall. Petzl makes such a contraption for $200 for industrial applications but this seems like overkill. The next best thing is something that rides up and down the safety line with almost no friction until it is loaded and then prevents a fall. The attachment should be close to the climber as a fall abruptly stopped by a safety line can be deadly if from enough height. A 2 meter fall will likely break the halyard and or the hardware attached to it, for example. The idea then is to move the safety attachment easily and quickly with each foot of ascent or descent. The best solution I tried is a simple prussic knot loosely attached to the safety line such that it can be slid up or down with one hand. Weight it up and it will stop your fall. Don't weight it and it is easy to move. This simple knot, or one of its variations, out performed any expensive piece of hardware I tried although I did not try the $200 one. Use three wraps on the prussic and some 1/4" climbing rope. REI even made up the loop for me using 6 feet of rope and a double fisherman knot.Getting Down With The Safety Harness
One final comment on the safety line. Should the main bosun's chair fail or halyard fail, you will be hanging from your safety harness. Because I have always used my boats yacht harness, I decided it might be a good idea to see what it is like to hang from a line with my marine harness. I am pretty sure any fall at all would rip my arms off and even if my arms survived, hanging there for any length of time would probably kill me. There is a medical term for how you die that way that I saw in one of the 100 YouTube videos I watched but lets just say that trying it convinced me that the video was accurate. Although climbing harnesses are uncomfortable if used on the main line, I bought one to use as my backup for the safety line.If you do get stuck hanging from your safety line you should know how to get down. Watch some videos on climbing a line with just a prussic knot because this may be what you have. The trick is to get the line between your feet and stand on the line. Get the line to the left of your left foot. Then move your right foot over so that the line is to the right of your right foot. Move your right foot over to its normal position. At this point the line will be going from the deck, over your left foot, under your right foot, and from there up the mast. Now take your left foot and stand on your right foot. You can now stand up and slide the prussic knot down the rope a little. Repeat and hope you get down before you expire.
NOTICE: Some pages have affiliate links to Amazon. As an Amazon Associate, I earn from qualifying purchases. Please read website Cookie, Privacy, and Disclamers by clicking HERE. To contact me click HERE. For my YouTube page click HERE