Winch Service Manual for Barient No. 20 - 1969
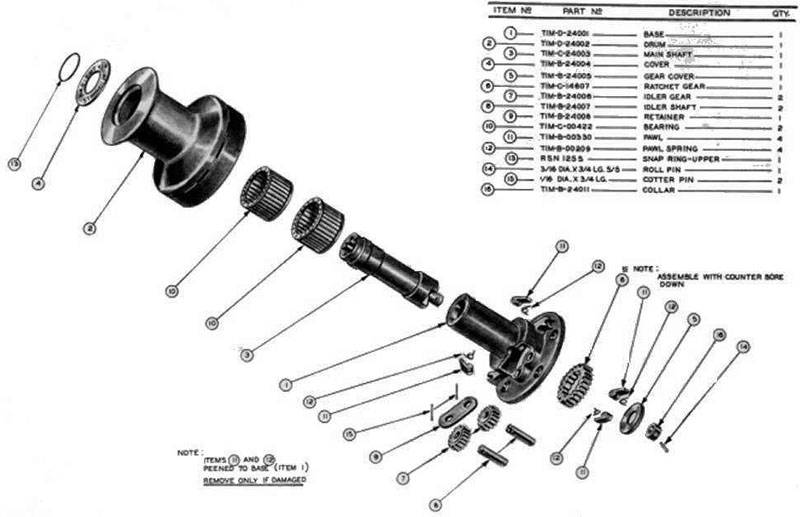
1. Remove snap ring (#13) using screwdriver or small pointed object. (Use spiral motion rather than pulling straight up.)
2. Lift off drum (#@) and cover (#4) simultaneously from base (#1).
3. Remove cover (#4) from Drum (#2).
NOTE: TO PROCEED FURTHER, BASE MUST BE REMOVED FROM DECK OR MAST.
4. Remove two bearings (#10) from base (#1).
5. Remove two cotter pins (#15) holding retainer (#9).
6. Remove retainer (#9) covering two idler gears (#7).
7. Remove two idler gears (#7) from two ider shafts (#8).
8. Remove roll pin (#14) through collar (#16) and main shaft (#3) on bottom of base (#1) using 3/16" pin punch.
9. Remove collar (#16).
10. Remove main shaft (#3) from base (#1) using rotating motion. (Ratchet gear (#6), two pawls (#11), two pawl springs (#12), and gear cover (#5) fall out during this operation.)
11. Inspect two pawls (#11) and two pawl springs (#12) on base (#1), clean and oil. (Do not remove unless broken.)
12. Wash all parts including inside of base (#1) and drum (#2).
13. Lightly grease inside of base (#1).
14. Grease two bearings (#2).
15. Assemble two pawls (#11) and two pawl springs (#12) onto main shaft (#3) noting correct pawl position.
16. Turning main shaft (#3) counter clockwise, assemble into base (#1) inserting end with two pawls (#11) first.
17. Assemble ratchet gear (#6) over main shaft (#3) on bottom of base (#1) and rotate to check freedom of movement. (Note - Be sure ratchet gear recess faces out.)
18. Oil two pawls (#11) on main shaft (#3).
19. Assemble gear cover (#5) over ratchet gear (#6).
20. Assemble collar (#16) over gear cover (#5).
21. Assemble roll pin (#14) through collar (#16) and main shaft (#3) using 3/16" pin punch.
22. Assemble two idler gears (#7) over two idler shafts (#8). (One gear over each shaft.)
23. Assemble retainer (#9) over two idler gears (#7).
24. Oil two idler shafts (#8).
25. Assemble two cotter pins (#15) into two idler shafts (#8) to secure retainer (#9).
26. Assemble two bearings (#10) onto base (#1).
27. Assemble drum (#2) over base (#1).
28. Assemble cover (#4) over drum (#2).
29. Assemble snap ring (#13) over cover (#4) seating securely into groove of main shaft (#3). (Use spiral motion as when removing rather than shoving straight down.)
NOTICE: Some pages have affiliate links to Amazon. As an Amazon Associate, I earn from qualifying purchases. Please read website Cookie, Privacy, and Disclamers by clicking HERE. To contact me click HERE. For my YouTube page click HERE