Ultimate Unassisted Mast Climbing
This article first appeared 6 years ago, was updated once, and now in January 2026 has been extensively updated to improve clarity based on reader feedback.
Introduction
It had been several years since I last went up my mast, and this year it was time for a thorough rigging inspection. At 77 years old, the thought of having my crew haul me up briefly crossed my mind, if only because of my age. But I have not had anyone haul me up the mast in decades, and this climb removed any lingering temptation to go back to that. The bottom line is I feel safer putting my life in my own hands.
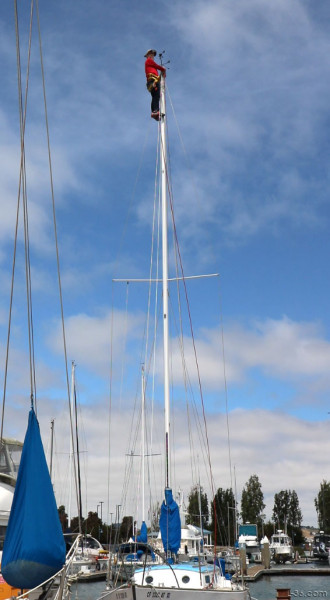
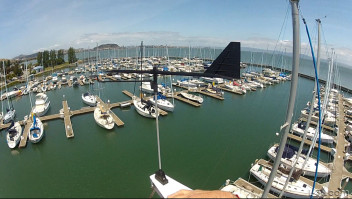
For this climb I went up unassisted, with my crew present only as backup in case something went wrong. In the past, I once tried being lowered by crew and found that far more frightening than rappelling down under my own control. This time, as before, I climbed the mast, inspected everything I needed to see, and came back down under full control. Nothing went wrong as you can see from the photo to the left, taken by my crew with his phone.
This article documents the system I use for unassisted mast climbing. It is the result of years of experimenting with different approaches, keeping what worked and discarding what did not. I am not suggesting this is the right system for anyone else, only that it is the one I use and am comfortable with. Safety is your responsibility. What follows shows what I actually rigged, how it works, and why I prefer it to other methods I have tried.
The article has been updated, inspired by my recent use. I recommend you watch the video first.
YouTube Video Overview (4.5 minutes)
Overview
I have tried dozens of ways to climb my mast. In the process I have accumulated way too many ascenders, rappel devices, carabiners, and a GriGri. I think this climbing system is the best. It is simple to rig, quick going up, requires very little to transition from up to down, and is very fast and controlled going down. It takes just a couple of minutes to get down, including rigging the rappel device.Safety
Mast climbing is inherently dangerous. A fall from the mast can result in serious injury or death. I am not telling you that this system is safe for you, or that you should use it. The safety of any method depends on the equipment used, how it is rigged, and the skill and judgment of the person climbing.
This article documents what I do on my own boat. If you choose to climb your mast, you are responsible for evaluating the risks and deciding what is safe for you. I share this for your entertainment and provide links so you can see what I actually used.
A Note on Links
Some of the links on this page are affiliate links. If you go to Amazon through one of these links, I may earn a small commission. It helps support the time and effort that goes into creating this content. You don't have to purchase the exact item in the link for me to earn a commission so feel free to shop around. Thank you for your support.
Amazon sometimes changes where a link ultimately lands. You are responsible for making sure that any equipment you buy is appropriate for its intended use. If an item is part of a life-support system, it should be UIAA certified and match what is shown and described in the article.
How I Evaluate Safety
I started unassisted climbing using the original Top Climber. I do not consider that system safe, and it almost killed me once when the shackle opened itself up and I was hanging halfway up my mast with a completely unscrewed shackle held in place only because it was under load and could not completely drop me. The newer Mast Climbers are improved and do not have the issues mine had, but they have other issues as discussed in my first article.
I also do not consider having someone haul me up the mast as safe. If they let go of the rope, I would fall.
I do not consider any video I have seen for climbing a mast to be safe. Based on my experience, I insist on 100% redundancy. I use two halyards and two climbing-grade ropes, and I do not rely on the shackles on the halyards. One rope goes to the bosun's chair and the other to a climbing harness.
I do not consider a yacht-type chest harness to be a safe backup. If you hang in one long enough, you will die. They are designed for situations where you are mostly in the water, not suspended from a mast.
I always want to be tied to both ropes so that if one were to fail, the failure would not be fatal. That is how I evaluate safety, and I encourage everyone to take charge of their own safety and not do anything until they have personally determined it is safe.
How the System Works
This method uses two independent ropes. I climb the left rope using two ascenders, with the upper ascender attached to the bosun's chair and the lower ascender attached to foot loops. The right rope is a backup that is attached to a climbing harness with a prusik knot. On descent, this same rope is used for a controlled rappel through a belay device and is still backed up by the prusik.
Because the two ropes are attached to separate pieces of gear and serve different roles, the system is fully redundant. Any single failure will not be fatal.
Going up is efficient and low effort because the climb is driven by my legs rather than my arms. The motion alternates between standing in the foot loops and raising the bosun's chair, then sitting in the chair and raising the foot loops. The backup prusik is advanced as part of this same rhythm. Once established, the process repeats naturally and really is as simple as one-two-three.
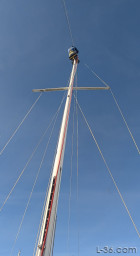
I can get higher on the mast than with any other method I have tried because the bosun's chair attaches right next to the top knot. This allows me to get high enough to comfortably service masthead instruments. Because the ropes are free to move rather than being fixed at the deck, I am not locked into a single position. This makes it easy to swing out to the spreader tips or move around to the other side of the mast when working.
Getting down is done with a descender, specifically a belay device, rather than by reversing the climbing process. It is simple to rig at the top, and the descent is controlled and predictable. Because of that, getting down is also fast. I can be back on deck in less than a minute, or about two minutes if you include the time to rig the descender.
The Design
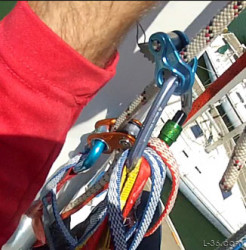
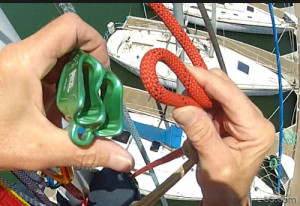
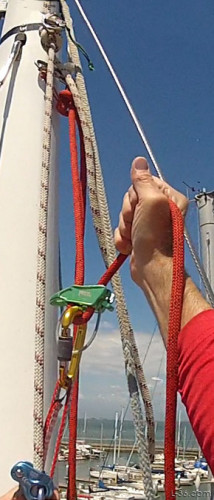
The main line has a Wild Country Ropeman 1 ascender attached to a bosun's chair. The compact design of the Ropeman places the attachment point higher than most other devices, which allows the chair to get closer to the masthead.
The Ropeman 1 does not have sharp teeth like the Ropeman 2. This is a critical design detail. In this system the ascender must function safely in both ascent and descent contexts. Sharp teeth are not needed and are undesirable because they are hard on the rope and interfere with controlled rappelling. The Ropeman 1 can slide down the rope when held open, yet its grooves provide more security than devices such as the Microcender discussed in my initial article. It has the best combination of security and compatibility with a rappel of any ascender I have tested.
The other element is the CT RollnLock ascender, which holds the foot loops. Because it is released during the rappel, the design requires it to be secured to the main carabiner with a sling so it cannot be dropped. Unlike a traditional two-ascender system, the foot loops are below the ascender that supports the bosun's chair. This arrangement allows the bosun's chair to reach the top of the mast.
The RollnLock works well in this position because I can pull up on the line to advance the foot loops. It is less awkward than using a traditional ascender below the main ascender, although something like a basic ascender will work. Once my weight is on the rappel device, the RollnLock can be locked open and simply slides down the line, prevented from falling farther by a 3 foot sling.
The second line is both the backup and the rappel line. It is attached through a prusik knot to the climbing harness. This completes the 100% redundant nature of this design. This second line needs to be sized for the rappel device so in my case I use the thinner of my two static climbing lines for the backup/rappel line. The prusik provides the auto rappel which gives the descent a very secure feeling. I can even let go and the prusik will stop the rappel.
For foot loops I am using 1 inch UIAA tubular webbing. The finished length is about 2 1/2 feet. If I had to make one today, I would take a long enough section of webbing, double it over, and tie a figure of eight knot leaving a small loop for the carabiner. Then I would do the same for the foot loops themselves making the loops large enough for my feet. Finally I would tie a figure of eight in the middle so it will grab the mast when I put one foot on each side. With this setup, it would be completely adjustable although it would also require some trial and error. I actually used a sewing machine. It was too long so I tie knots in it to shorten it.
In this design, the rappel device is always attached to something so there is no risk of it being dropped. The ATC stays clipped to its carabiner until the rope is threaded and ready to be clipped in. It is connected to the main carabiner with a short sling.
It is important that this sling can pull freely on the carabiner and is not trapped on the wrong side of the Ropeman. Don't ask me how I know. I now make sure the short sling can be removed without opening the main carabiner so it can be repositioned if needed. I do this by using a 1 foot sling doubled over. If I want more length, I could also use a luggage tag to attach it to the main carabiner.
When rappelling, releasing either the prusik or the Ropeman will stop me. Grabbing the prusik tightly will also stop me. This behavior is important because panic reflexes can be dangerous when using devices like a GriGri as a descender without a backup. Rock climbers are trained to let go and trust their equipment in a fall, but with a GriGri that same grabbing reflex can defeat the locking mechanism. This system behaves differently: letting go stops me, and grabbing the prusik stops me as well. That is one of the reasons I no longer use a GriGri.
A Picture is Worth a 1000 Words
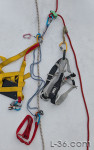
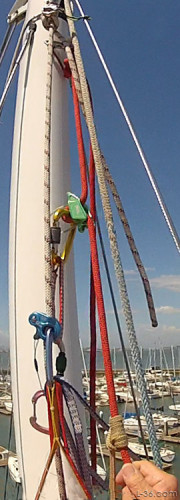
THIS page shows all the gear and where it sits relative to the lines and the rest of the gear. The sections below talk about each element but this gives an overview.
If you have any questions, just leave a comment in on the Contact page. I answer all comments.
Setup
I always tie my climbing lines to the eye of the shackle so I am not depending on the shackle mechanism. I use a bowline because it is strong, I know how to tie it, and it is easy to untie. I use a long tail for safety. I use two climbing lines each hauled up on its own halyard secured with winches and cleats.
Rope
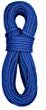
I have not tried this method using normal yacht rope, and I am not really sure how well it would work. I am fairly confident the main line ascent would be possible, but I am less certain about rappelling on yacht braid. Beyond whether it would work at all, it would almost certainly be hard on the halyards, and for that reason alone it is probably not a good idea. I use Amsteel halyards, so using halyards for climbing was never a consideration. There are several types of climbing rope, and the kind I use is called static line. I tried climbing on dynamic rope once and it was like trying to climb a rubber band; it technically worked, but it was extremely inefficient and unpleasant. I now use a 10.5mm static climbing rope as my main line and a 9mm static rope as my backup. I have considered using a dynamic rope for the backup line, but I have not tried it, so I cannot say whether it would be better or not; a reasonable case can be made either way. I bought my main line from REI and my backup from Sterling. Some of the Amazon ropes look inexpensive and may be fine, but I would not buy them.
Harness
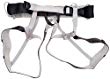
I have tried several different harnesses and find a mountaineering harness like the Petzl Tour is ideal. The other two harnesses I have are rock climbing harnesses and have lots of padding and stiff loops for hanging gear. The Tour has no padding and no bulky gear loops, which makes it more comfortable for wearing under the bosun's chair without getting in the way. It would probably not be comfortable to fall in, but it would save my life in the unlikely event that something breaks. The belay loop on the Tour works well for the auto belay on the rappel.
Top Ascender
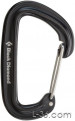
The top ascender is a Wild Country Ropeman 1 . I attach my bosun's chair to it. I put a small carabiner on its wire which allows me to easily hold it open when descending and provides the safety of grabbing the rope if I let go. Wild Country has a video series on the Ropeman and I recommend watching it on Youtube. It shows how to attach it and how to use it to move up and down. They use two Ropeman, one on the lower and one on the upper ascenders. Using a lower Ropeman will not work for me because I need to lock it open as I don't want to have to remove it at the top of my mast. The lack of sharp teeth allows the top ascender to easily descend as there are no sharp teeth to snag the rope. I tried using two Basic Ascenders and it is a problem. The Ropeman 2 has sharp teeth so I didn't buy it and instead went with the Ropeman 1.
Prusik

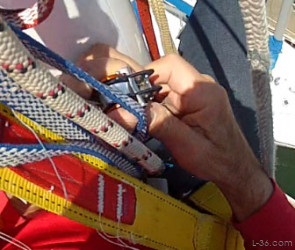
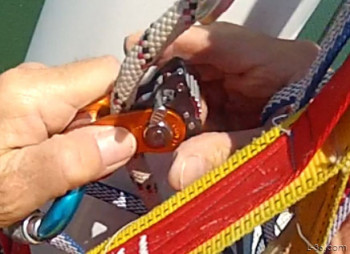
The special high temperature prusik provides both the safety going up and the auto belay for the rappel going down. I attach it to my harness' rappel loop. I tried three kinds of prusiks in this position. An autoblock was best going down but is not known for its resistance as a safety line for going up. The Klemheist was great for going up but just held too tight for use as the backup for a rappel. The classic prusik was the compromise and is what I am using. That said, the prusik has to be on a short enough loop so that it cannot hit the ATC on descent or else the ATC will release it which would be bad. The Sterling Rope 6.8mm Hollow Block Loop, 13.5-Inch is just the right length and has the added advantage of being made of some magic high temperature line so the friction on the descent won't burn through. Note, Prusik, Autoblock, and Klemheist are all friction hitches.
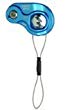
Auto Advance Pulley

The pulley will auto advance the prusik. I attached it under the prusik and clipped it to the belay loop on my climbing harness. As I went up, the pulley pushed the prusik up so I didn't have to. After a few more climbs, I decided the saving was not worth the added complication so I quit using it. I used THIS inexpensive one. Maybe I will give it another try, who knows.
Lower ascender
The lower ascender is a Climbing Technology RollnLock Pulley. My foot loops are attached to it. It has a built in pulley that makes it easy to advance it by pulling up on the line. The RollnLock is attached to the upper ascender to hold the RollnLock when it is locked open for descent.
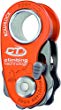
Rappel Device
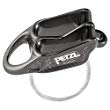
I tried both an ATC and a figure eight rappel device. They both worked. I liked the figure eight except that I had to thread it while I was just holding it. In other words, without it being clipped in. The ATC has a loop that can be clipped to the system while the line is threaded through. Then the carabiner can be attached to the rope to complete the setup without risk of anything falling. I attach the ATC to the bosun's chair carabiner with a short sling. The sling just makes things work better so I don't have a bunch of metal things all trying to be in the same place at the same time. I use a Petzl Reverso.
Slings

I use 2 slings. The shortest is used to tie the ATC to the main carabiner holding the chair to the Ropeman. I used a 12 inch sling looped around one of the carabiners to shorten it to 10 inches, but next time I will double it over so it is effectively 6 inches. If that turns out to be too short, I will luggage tag it to the main carabiner and clip it to the ATC carabiner, something I could do aloft after the ATC was secure on rapel/ backup line if needed. The long one is 36 inches. It ties the main carabiner to the RollnLock. When the RollnLock is opened, I let it just fall down the rope held up by this long sling. I could have used some accessory cord for the foot loop as it is only needed to keep the RollnLock from falling all the way down the rope once released but the sling is nice.
I initially used a sling to attach my harness to the bosun's chair. I decided the added redundancy wasn't worth the added complexity, so I quit using it, but it is in the video so I thought I should say something.
Foot Straps

I made my foot straps out of this stuff.
BlueWater Ropes 1" Tubular Climb-Spec Nylon Webbing
It comes in a variety of colors and in 30 foot lengths. I sewed mine but ended up tying a knot in it to shorten it so maybe I should have just made it with knots to begin with. I could also have used three slings and luggage tagged two foot slings to a longer one that goes to the carabiner. Lots of ways to do it but having the two foot loops close together so that I can press into the mast and grip the sides is nice.
Ascending
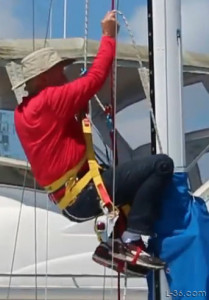
Going up is a simple process. I pull up on the rope below the RollnLock to advance it (left). The RollnLock has a sheave that makes this go very smoothly. I pull up as high as I can as there is a small fall back when the RollnLock is released so I will have a bit more rope to work with and won't be as crunched. Then I stand up while sliding the carabiner on the Ropeman up (right). It is important to grab the carabiner and not the Ropeman itself as I might release the cam if I tried and grab the Ropeman itself. This is not really a problem as grabbing the carabiner is more natural. The safety prusik needs to be checked to make sure it is auto advancing particularly at the beginning. If I don't have the pulley connected, I just make it a three step process and move the prusik up by hand. The dual foot loops have a "Y" that is fairly short and that allows me to press against the mast and grab it with my feet. That provides some security and stability to the climb. It also ensures I am pressing down with my feet rather than out. It is a lot easier to climb a mast than to climb the free rope I used in practice.
At the top
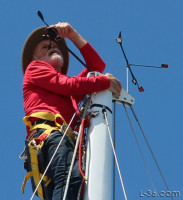
When I get to the top I just raise the RollnLock as high as I can and stand up. I can get higher if I just push it up the last few inches rather than pull the rope below up as that way I avoid the "fall back" of the RollnLock. It might be easier to just shorten my foot loops. Regardless, I can get above the top of the mast to work on my instruments or inspect every part of the mast. This method gets me higher than either of the other two methods I have tried. It is high enough to service anything I might need to do.
In the pictures you can see I am holding on but if I put a line around my body and secured it to the mast I could then stand against that and have both hands free. I have not tried that but have been told by multiple people that it works.
The view from the top is spectacular. I probably climbed 20 times just to make the video and enjoyed every moment.
Getting Down
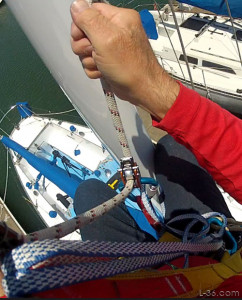
To get down, I need to reverse what I did going up for just a couple of feet. I lower the RollnLock by holding the gripper off the rope and lowering it down but not so much that I can't stand on the foot loops. Then I slide the Ropeman down as I lower myself. I stop a few inches from the RollnLock. Doing this a couple of times frees enough line to set up the rappel. On the left I am lowering the RollnLock to the point where I can just stand on the foot loops. On the right I am releasing the cam on the Ropeman as I just slide down until the Ropeman is about 4 inches above the RollnLock.
Rappel Setup

The one thing I do at the top is install the rappel device. I prefer using an ATC as there is less chance of dropping it because it can be clipped in to a short sling while I thread the line through it. After it is threaded, I can open the carabiner and clip it through the loop in the rope. I practiced this in my attic before I did it on my mast which I think was a good idea but it is pretty easy to do.
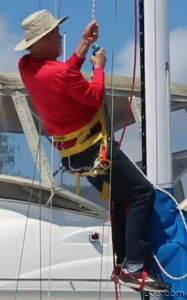
Descending
After the ATC rappel device is rigged, I take the slack out of the line from the mast top to the ATC by pulling up on the line below the ATC which slides the ATC up. Then I raise the prusik to tighten everything up.
At this point I stand and release the Ropeman and descend until all the weight is on the rappel device. The prusik does an auto belay so I don't have to touch it. Now I lock the RollnLock open and let it fall on the ascending rope. It won't go far as it is still held up by its sling.
Going down is very controlled. I hold the Ropeman open by pulling up on the small carabiner attached to the lanyard that holds the cam open. With the other hand, I push the top of the prusik down which releases pressure on the ATC rappel device and allows me to go down. I can slow the descent by squeezing the body of the prusik with my hand or speed the descent by gently pressing on the top of the prusik. I should note that the tighter the prusik is, the slower the descent will be. At any time I want to stop I can squeeze down on the prusik or just let go and let the prusik stop me. Releasing the Ropeman will also stop me. If the prusik is too tight I have to push it down the rope and then lift everything up to toward the rappel device to descend. Alternatively, I can loosen the prusik a bit and then continue down more quickly.
Comparison with other systems

For those of you who have followed my other articles, let me comment on the reasons I like this one over the other two I have written about. The "Modified" system uses two ascenders and goes up in a similar method to this one with two exceptions. The upper ascender on the Modified system was a Microcender and it is no longer available. The recommended replacement is a Rescuecender and it is quite large which puts the attachment point lower than the knot on the climbing line. The Ropeman 1 puts the upper attachment point basically right at the knot. The lower ascender on the Modified system is a Basic Ascender and while this method will work with a basic ascender as the lower, the new method of advancing it works really nicely with the RollnLock. The main disadvantage of the Modified System is that going down is just about as difficult as going up.
The GriGri system has the advantage that it is easy to go down. Sometimes too easy and I initially found it frightening. I modified it to provide more controlled descent but it got so complicated that I often rigged things wrong and had to improvise at the top. It also took so long to re-rig at the top that I could have gone down by the time I was finished changing things around. There is no re-rigging with this new system although I do have to rig the descender. But that takes about a minute and then it is a very controlled and not at all frightening ride to the bottom. The other problem with the GriGri system is that I can't get all the way to the top because the GriGri is both large and has a tendency to work its way down if I sit down after being on the top. I made more modifications to that system to help lock the GriGri when at the top but again that just made it more complicated.
The bottom line is that this system is very easy to climb, I can get higher than with either of the other systems, and getting down is fast and fun -- and very controlled. It is my preferred system.
The One Armed Sailor
I got an email from a sailor asking for advice on how to climb his mast. He had only one arm and described himself as a single-handed sailor. I appreciated the humor and his good nature. I advised having someone haul him up but he wanted a way to get up by himself. We talked a bit and I recommended the GriGri system but with a foot ascender so he did not have to pull on the line and could use his one hand to hold onto the rope and pull himself up. I bought a foot ascender to give it a try and while it worked, you have to basically climb three times as far because of the 3:1 purchase of the GriGri. And because you are only using one leg and there is friction in the GriGri, it is about as hard as climbing with these other methods but again three times as far to climb. I got the idea from a fellow sailor who climbs trees for a living. I guess he is a lot stronger than I am.
NOTICE: Some pages have affiliate links to Amazon. As an Amazon Associate, I earn from qualifying purchases. Please read website Cookie, Privacy, and Disclamers by clicking HERE. To contact me click HERE. For my YouTube page click HERE