Amsteel to Tenex Halyard Splices
Updated 4/5/2024
By Allen Edwards
Introduction
NOTE: There are three variations that all would work. The main part of all three is Amsteel. The tail on the first is Tenex covered Amsteel. The second splices the Amsteel to the Tenex. The final one splices Amsteel to Sta-Set. The actual line used in the third is 1/8 inch Amsteel like you might use on a small boat. I used 3/16 Amsteel for my 36 foot boat.Tenex over Amsteel

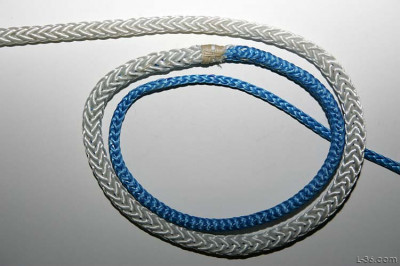
Tenex to Amsteel Splice
Amsteel to Sta-set Splice
Project Goals:
- Replace wire halyard and wire winch with a normal winch and rope. The wire winch has its difficulties and is considered dangerous. Eliminating it was a main goal.
- Keep the low stretch properties of the 5/32 wire.
- Reduce weight aloft.
Constraints:
I did not want to replace my masthead sheaves which have a grove for a 5/32 to 3/16 wire. It was therefore desirable to use some small diameter high strength line. 3/16 Amsteel is small enough and has stretch properties about the same as the 5/32 wire I am replacing so it is a perfect fit. It also "looks right".The 3/16 Amsteel is too small to work with your hands. It is also too slick for a winch or a cleat. This means some kind of cover is required for the part of the halyard that goes over the winch on down to the end that you will be pulling on to hoist the sail. The standard approach would be to use a cover from a double braid that has a 3/16 core and replace the core with the Amsteel. For the case of 3/16 Amsteel, that wold be 5/16 which I judged to be too small. I decided to use a cover of 12 strand after seeing some Regatta Braid in the store. However, Regatta braid snags on everything so I didn't want to use it. I found Tenex, which is not marketed to marine. It is very inexpensive and coated so it does not snag. The finished halyard with the 3/16 core inside the 3/8 12 stand Tenex is about 7/16, a nice size for handling the halyard.
Splice #1:
- The halyard goal was about 35 feet of bare Amsteel and 40 feet of covered Amsteel. I added 5 feet to each to be save and added 5 additional feet of cover for the shrinkage you get when the core is inserted.
- Thread the 3/16 Amsteel inside the 3/8 Tenex. Lock stitch the end and milk the cover tight over the Amsteel.
- About 6 inches down from where the joining splice will be, lock stitch the assembly and whip over about an inch. The end of this will be the splice location.
- Cut every other strand of Tenex leaving 6 strands.
- Using a splicing wand, pull the 6 strands of Tenex through the Amsteel core and out about 9 inches away.
- Taper the Tenex.
- Pull the Amsteel over the tapered strands burying it.
- Whip the Amsteel part of the splice.
- Form a Brummel splice for the halyard shackle using the method here
- Test the length and adjust the position of the Brummel splice to fit.
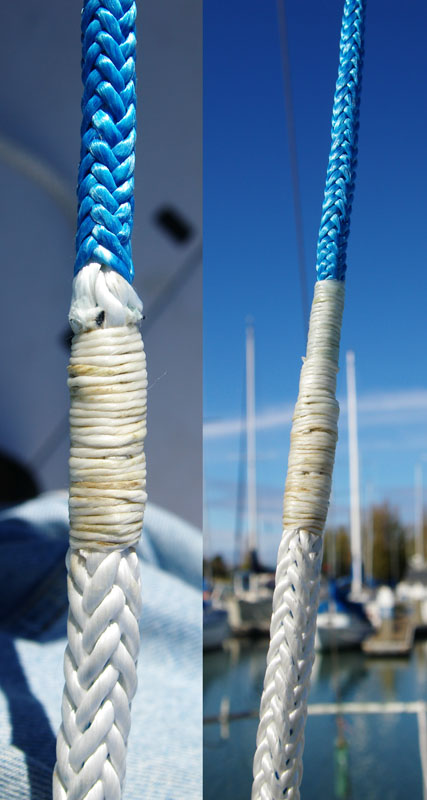
First picture if of just the first whipping and the bury of the 6 strands of Tenex inside the Amsteel. The entire area was whipped and that is shown in the second picture.
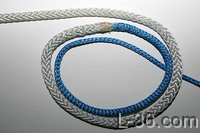
Variation - Splice #2
For this splice, I buried 13 1/2 inches of 3/16 Amsteel with the last 4 inches tapered into the 3/8 Tenex starting 12 inches from the end of the Tenex. This leaves a tail of Tenex some of which will be buried into the Amsteel. Bring the fid out after about 16 inches of Tenex and don't let the end of the Amsteel go back end until you get the splice done. Then cut every other strand on the Tenex at the junction so that you have a 6 strand braid 12 inches long. Bury that into the Amsteel using a fid. Both of these buries are easy. Remove the 6 strand Tenex about 15 inches along the Amsteel and taper it. Adjust the splice for a smooth transition and run a lock stitch across the splice in an S shape. Run this stitch an inch on each side of the splice. You will now have a nice splice but with 6 strands that are just cut off at the splice. Whip these to cover them.
Theory
This splice gets its strength from the section with the Amsteel buried inside the Tenex. This needs to be long enough to have enough friction to hold the splice together. I used about 72 diameters or a bit over 3.5 fid lengths. The friction is provided by clamping force from the Tenex braid constricting over the Amsteel. This force comes from the Amsteel pulling on the buried Tenex. The Amsteel has tremendous grip on the buried Tenex because the weave of the Amsteel is opened up so much from the fat bury. When force is applied, the Amsteel resumes its more normal lay and the Tenex is compressed. The pull on the 6 strands is translated into all 12 strands of the Tenex within just a few inches as the 6 pulled strands first compress the other 6 Tenex strands. The result is that all 12 strands of the Tenex compress down on the Amsteel holding the splice together. At least this is how I saw it when I tested the splice.Testing
I was only able to test this splice to 1300 pounds (about the maximum working load) as that is about what I can get from my 40 power winch and 32 pounds of weights pulling on the 10 inch handle. There was no sign of stress in the splice. This is significantly below the 5800 pound rating of the Tenex but then again, this is for a Halyard and my Halyard winch is only capable of generating about 1/4 that load. Beyond that, you should have the splice on the winch with 3 turns so the load will really be off the splice in use anyway. I have no reason to believe the splice isn't as strong as the line but I have not tested it to that point. I can tell you that 1300 pounds is very tight and the lines involved are stiff like wire rod at that point. I run my forestay at less that that so this is a significant load. The main goal in a halyard is low stretch, not breaking strength so my feeling is that this is sufficient. Your safety is your responsibility so test any splice you make before putting it into service.Variation - Splice #3
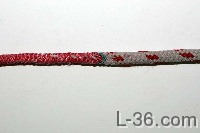
This one splices Amsteel to Sta-Set double braid. CLICK HERE for the instructions and test results.NOTICE: Some pages have affiliate links to Amazon. As an Amazon Associate, I earn from qualifying purchases. Please read website Cookie, Privacy, and Disclamers by clicking HERE. To contact me click HERE. For my YouTube page click HERE